COVAL CERTIFICATION TRAINING PROGRAM

Welcome to the Coval Certification Program information page! From here you will be able to get information about how to sign up for a class in your area.

Coval Certification training is not a rah-rah sales class set up to sell you more product. It is a class that will train you how to:

1: Identify the substrate that you intend to restore. Most field mistakes and errors occur in this stage because a surface is not properly identified. This class will cover the geology of natural stone and the manufacturing process of synthetic surfaces so that you will be an expert in the field of identification.

2: Qualify the substrate that you intend to restore. Coval has two great coatings for natural stone and other substrates. One is the Coval Stone Sealer (topical) and the other is Coval Natural Sealer (impregnating). Which one of these to products would work best? The Coval Stone Sealer that sits on top or the Coval Natural Sealer that penetrates below the surface? The Coval Certification training class goes into various scenarios to train you to successfully navigate this decision process.

3: Prepare the substrate that you intend to restore. Almost no one is going to call you to restore a brand new countertop or surface. Usually by the time restoration contractors like us get to the site, the surface is worn, stained and abused. If the first two step, Identify & Qualify were done successfully then you stand a good chance of choosing the correct preparation process for the target surface. Our Coval Certification training will go over the various best practices for preparation of the various types of substrates that you will encounter in the field.

4: Execute the installation process successfully and turn your client into a raving fan! This step requires skill and practice. Our Coval Certification class will provide your local distributor with Coval samples to practice your skill in your garage or workshop before brining Coval products onto paying job sites. Our Coval Certification class will have detailed ‘how to’ step by step instructions and helpful ‘how to’ videos to help pave the way for your continued success in using Coval products. You will have exclusive access to these ‘how to’ videos thru our private Coval Support Facebook Group.

The only way to get access to our private Coval Support Facebook Group is to attend a Coval Certification class. Our private support group will be moderated by Certified Coval installers intended to answer questions and provide support for product application support issues. Product availability and purchase issues will be handled by the local Coval distributor.

Send an email to robertfalzone@robertfalzone.com and submit your personal name, your company name, your address, your telephone number, your email and your local distributor in order to get information about our next Coval Certification Training Program. If there is no local Coval distributor in your area, then there are options for remote classes via Zoom.

You can also type your detailed contact information into the comment box below and someone will get back to you as soon as possible.

Leave a Reply

RFSC Worldwide University

Anyone who knows me knows that I’ve been teaching for a very long while and it was only a matter of time before I made my own school so I could formalize my education program. The benefit of my teaching now as a ‘business’ means that I have the flexibility to form relationships with companies and manufacturers as well as individual contractors and being able to scale these relationships as they grow. Also, now that I am an approved instructor for the IICRC I can increase my reach through quality IICRC certification training.

The acronym ‘RFSC’ stands for Robert Falzone Sales & Consulting and it is my core operation. The primary product that I sell is education, while secondarily attaching quality equipment and supplies to my training programs. You can have the best product in the world, but if the end-user is a mis-user then sales will be sabotaged by bad reviews and lowered expectations.

RFSC Worldwide University is on the lookout for vendor partners in the manufacturing field that are looking for end user training from instructors with ‘real world’ experience in using their products. Equipment and chemistry used to clean, polish, protect, restore, decontaminate and deodorize all need end user training programs that in times gone by were provided by the distributor. Unfortunately, the new normal of ordering cleaning and restoration products and equipment online has caused a detachment between traditional sales reps and their clients causing a ‘training gap’. New products and technology that used to be introduced by friendly local sales reps are now introduced at far away trade shows and then ‘how to’ videos are uploaded for the end user to educate themselves.

I am looking to change that experience one happy end-user at a time. I love solving problems and passing along decades of experience to the next generation of cleaners and restorers.

If anyone is interested in engaging with RFSC Worldwide University, please send your inquiries to robertfalzone@robertfalzone.com.

Check out my FREE audio/video podcast by clicking the link below.

https://robertfalzone.podbean.com/

Follow me on Twitter @realRobFalzone

Verdell Barkaroni approves this blog post!

Raise Your Prices Before You Go Bankrupt! E-5

All the internet gurus are telling you to raise your prices but you don’t want to price yourself out of your market. Episode 5 discusses a simple formula for estimating your expenses that can be customized for any cleaning business.

Raise your prices before you go bankrupt! Episode 5

Episode 3

This episode discusses the politics behind where you buy your chemicals and other supplies. Is is misinformation when a company or internet personality advertises themselves as the ‘little guy’ in order the generate brand loyalty and sales? Whether you buy from a large corporation or the ‘little guy, this episode sheds light on what goes on behind the scenes and the economic engine that shapes the market.

Episode 2

Basic chemicals made simple!

Have you ever wondered why there are so many cleaning chemical choices? Have you ever walked into a cleaning supply store and feel intimidated by all the products? Do you need to use all those products? This episode explains the basics you need for any standard home and commercial cleaning company.

Rob Talkz Video Blog

Yes, I’ve decided to do a podcast/video blog. Why? It’s easier than writing a book. Let’s face it, nobody reads anymore and by the time I finished writing my book it would come out just in time for everybody to not read it.

I have a lot of infotainment to offer in the form of behind the scenes industry information and analysis, funny stories and expert industry knowledge. When I hang out with my industry friends and tell my stories they appear to be entertained. If they aren’t’ and they’re just humoring me then this will be a short lived social media experiment.

If you have any topics you want covered or if you’d like to volunteer to be a guest, email me at robertfalzone@robertfalzone.com.

This website, blog and all media presented therein are property of RFSC Worldwide LLC.

Basic Repair of Concrete Trip Hazards, Gaps and Cracks

It’s finally summer and the ice has melted, the sun is shining and you see sidewalks and concrete slabs everywhere that have formed fissures and elevated cracks because of ground shifting and moisture from a long wet winter.

These trip hazards need to be fixed and a restoration contractor with a little ‘know how’ can make a tidy sum of money while making the world a little bit safer one concrete slab at a time.

Here is a typical example of a concrete fissure formed by ground shifts and moisture.

20180317_074827 2

To a healthy, able bodied person this fracture with a 3″ lip may not seem like such a big deal, but to the elderly and mothers with small children this is a dangerous hazard.

You don’t need to be a large concrete grinding operation to tackle jobs like this. Cracks and fissures of this nature form all the time in the driveways of your existing clients, the sidewalks of your commercial accounts and everywhere in your neighborhood where you live.

This blog will show you the steps you need to take in order to effectively fix these hazards while making money doing it.

20180317_080621 2

A ‘scarifier’ is aptly named. When you first try using one the experience is pretty scary. (ok, enough jokes) …but seriously, it’s insanely scary when you fire one up for the first time. This size scarifier is considered a ‘mini’. They are available much, much larger.

You might own a weighted 17″ side by side or a large concrete grinder (either planetary or counter rotating) but the most ideal machine for tackling this problem effectively is a scarifier.

One side of the lip of the fissure is raised 3″, so using a weighted side by side and trying to hold it onto one side of the fissure in order to grind down is not only uncomfortable, but ugly. Another good reason not to use a weighted side by side machine when there is an elevation differential is that you will more likely be effecting a larger area, but with a scarifier you can focus on just the crack as opposed to making a 4′ wide swing with a side by side machine. Why expend energy where the crack isn’t. By focusing on the area you can be more efficient and profitable.


Looks like the surface of Mars…

20180317_081027 2

That’s why scarifiers are handy if you know how to use them…

After you’ve gotten both sides the concrete fissure leveled we can begin to smooth out the damage done by the scarifier with a metallic grinding disk.

20180317_081626 2

You could get on your hands and knees to grind, or you can get a stand-up model which will make the job much more pleasant…and save your knees.


Using a metal disk to grind will smooth out the concrete and make for a visually attractive repair. If you leave behind scarifier scars then they’ll know you’re a rookie or worse yet, lazy. 🙂

This ugly leveling job was done right in front of the home of Josh Jones, the President of STI Prepmaster and an industry concrete expert. He naturally wanted to jack hammer it out but I told him that the art world might have better appreciation for it…

josh001

This may be the work of a great artist…or a very lazy city worker…bleah.

diamondhoar

Art!

With the help of his fake dog Ariel, or Argentina or whatever he calls it, Josh used a scarifier to properly level and then he used a grinder to properly grind. He’s sending the bill to his local councilman.

fakedog

Now let’s get rid of those nasty scars from the scarifier… (scars, scarifier… you see what I did there?) 🙂

You can see that we are using vacuums to keep from making a cloud of silica dust. New laws have been passed requiring a proper vacuum to be hooked up to any silica dust creating machinery. The days of using a plain weighted machine with no dust shroud are gone to dry grind are gone. Making a cloud of silica dust can risk a $5000 fine.

20180317_091827-2.jpg

Flat, smooth and vacuumed out, now we are ready to fill the crack with self leveling exterior crack repair caulk.


20180317_093148 1

Here’s a view from a different angle. We have exposed some of the aggregate in this process, but the idea was to make it smooth and flat to eliminate the trip hazard. The visual architectural appearance was low on the list compared to the safety needs.

Use self leveling caulk to make sure it will get down into the crevices for deep fissures.

20180317_103251 1

20180317_122440

In this case the client overfilled and flattened the caulk in order to make sure it went all the way down. After it becomes tacky, they’ll scrap off the excess…

20180317_120754.jpg

…or maybe they’ll leave it… They drove over it already. Nice and flat. No more trip hazard.

From a large crack with a 3″ height differential on either side we now have a repair that any property manager could be proud of. This is just a basic job, in some cases you have expansion joints to worry about and other engineering considerations.

This is just to show a basic repair that most restoration professionals can do on a driveway, a sidewalk or in this case, a parking lot.

My name is Robert Falzone and I train folks how to solve problems in the industries of cleaning & restoration, abatement and surface prep. If you would like a consult, contact me via the my information found in the ‘About’ section of this blog.

Thank you for your support. Mr. Verdell Barkaroni says, ‘Hi’.

cropped-cropped-20170618_112727.jpg


Waterless Wood Floor Restoration Using Dry Compound and a Counter Rotating Brush Machine (CRB)

Wood floor cleaning is not for the faint of heart. I’ve written several blogs in the past regarding how to clean wood floors and they all involve water. Water, sometimes with surfactants and organic solvents added are needed to cut through dirt and grime, even on wood floors even though there is potential to damage them.

The problem of using water to clean wood is that wood absorbs water, and if it gets too wet, it can pucker permanently. That has a lot of folks scared because no matter how many classes they take because they don’t want to buy a new wood floor by puckering it up. Sometimes a wood floor is already puckered because of humidity, previous water damage or a previous cleaner using too much water. Using the waterless restoration process will not remove existing puckering, but it won’t make it worse either.

This blog is not meant to discourage the use of water to properly clean wood floors, but to merely offer a safe alternative for those who may be too chicken to put water on wood.

I am not taking credit for inventing this process. I’m just building on the work that others have started in an effort to create a reliable method that is easy to teach and to use.

Bamboo Wood Floor: dirty from new construction, some cupping from water damage, no areas where original finish is worn thin exposing bare wood

20190603_090709

This bamboo floor was cupping in some areas and the contractor was leery about using any water to clean this floor.

This bamboo wood floor is a classic example of not wanting to use water for liability reasons. There was some cupping and warping in some areas yet the polyurethane finish was not worn through in other areas and there was no evidence of water damage.

This home had an abundance of landscaping around it and the home sat low on the property. It was a pretty good chance that moisture from the irrigation system was seeping into the dry foundation and wicking up into the dry wood floor.

Nevertheless, the client wanted the floor ‘refreshed’. It didn’t need to be sanded down, just perked up a little bit. No problem using a counter rotation brush machine (CRB) and dry compound.

20190603_091816

Pictured here: CCA TM CRM with optional water tank attachment and CCA dry solvent compound

The Natri-Dry Compound from Carpet Cleaner America is simply the best dry compound on the market. It’s very chunky, like shredded wheat, so that there aren’t a bunch of little particles to go chasing around.

compoundreveal

According to the copy writer at CCA:

The compound is composed of soft, organic particles which are loaded with cleaning agents. It works by delivering these cleaning agents into the carpet fibers by “brushing in” with the CRB machine. The CRB brushes distribute the compound throughout the carpet and clean the fibers in the process. As the soil from the fibers become dissolved, the particles then reabsorb it like miniature sponges. Once this “brushing in” is accomplished, you simply “brush out” or remove it by using the CRB with our Renovator catch tray attachments. It’s extremely simple and easy to use.

For more information visit CCA at http://carpetcleaner-usa.com/products/dry-cleaning-compound/

20190603_091833

The Natri-Dri compound uses an organic solvent to clean the floor and absorb the dirt posing no danger to the wood floor.


20190603_092112

The TM machine from CCA with the Natri-Dri Compound did a terrific job of cleaning without using water. We swept the compound up and used a dust pan to get the compound off of the floor, and then we vacuumed up any leftover particles.


20190603_093051

Use a name brand water based urethane finish to coat the floor. Don’t use standard floor wax because wood finishes have additives in them to help the coating bond to the existing polyurethane. I like using Contec wipes to apply the finish because they are non-absorbent and capture stray particles that may be present.

20190603_094836

Nice!


20190603_100429

The homeowner was very happy with this demo and my client was able to book this job.

If you look closely at the pictures above and below you can see some evidence of the cupping and warping that made this job a little risky if water was going to be used. It was much safer and easier to use dry compound and a brush machine to clean before recoating.

IMG_2027(1)

The final product after one coat of water based polyurethane.

Wood floors develop personality over time and this process does not take away dents, deep scratches or scrape marks. What it will do is totally clean the floor and give it back some luster so as to delay a wood sanding job that would be very expensive and only performed by licensed flooring contractors.

Here is another example:

This abused wood floor was years in the making for a good demo.

001

With the settling of the sub-floor gaps developed between the planks where water would have settled and be absorbed into the wood. This made me very nervous about instructing my client about using a conventional water based cleaner. Using the Natri-Dry Compound on a floor with gaps poses a danger if you do not vacuum or carefully sweep out the gaps. A simply broom sweep over the top isn’t good enough.

002

Be generous with the compound in proportion to the amount of dirt and grime. The wood fibers infused with solvent can only absorb so much and when they turn dark you are no longer cleaning and you are only spreading the soil around. Bleah.

003

Move the machine back and forth and side to side rubbing the compound into the polyurethane coating. Over time the dirt particles have stuck to the poly finish like flies to flypaper, but the organic solvent in the  Natri-Dry Compound will soften the poly and then release the dirt with friction caused by the action from the counter rotating brushes.

004

The floor is clean and dry. No water, no puckering, no fear.

005

In some cases the client will only want their floor cleaned and not ‘coated’. That’s ok. The slight luster that the organic dry compound leaves is from the solvent in the powder moistening the surface and releasing dirt particles that we stuck in the polyurethane like flies on flypaper.

006

Using a single part water based coating is safer for those who ‘dabble’ in this kind of work. If you really want to be an expert then learn how to apply permanent coatings like solvent based polyurethane or 2 part water based epoxies for wood.

007

There you go. One waterless wood cleaning restoration square. This demo was a success and the client was very, very happy. 

This process will not take dents and dings out of the wood. Wood floors develop ‘personality’ over time. If a client wants a wood floor sanded down, then in most communities this requires a contractors license.

I do want to thank my good friend Dane Gregory for poking me to publish this blog. I’ve sat on it for a few months because I wanted to see some more testing done. In the meantime, others like Mikey from Mikey’s Board have been using this process on the wood floors in the charitable cleaning of Ronald McDonald Houses across the country and others have made comments on Facebook about it, but I decided after reflection that this process is scientifically sound and it takes a lot of pressure off of people who are afraid to do wood floors because of the ‘water’ issue. I also understand from my conversations is Dane that this process is also being tested by certifying authorities on Luxury Vinyl Composite Tile, otherwise known as LVCT.

Thank you for taking a minute to read my blog. My name is Robert Falzone and I have over 30 years of experience in the world of cleaning and restoration. Some of my methods are ‘old school’, some of my methods are ‘new school’ but either way my goal is to take some of the guess work and risks out of the world of cleaning and restoration in a world where risks can mean a big insurance claim if the job is botched.

Thanks again,


Robert Falzone


A Basic Study in The Field of Concrete Polishing, ‘Using Guard or Not’. Features and Benefits of Both.


28378618_1508375005885050_2509195162304161252_n

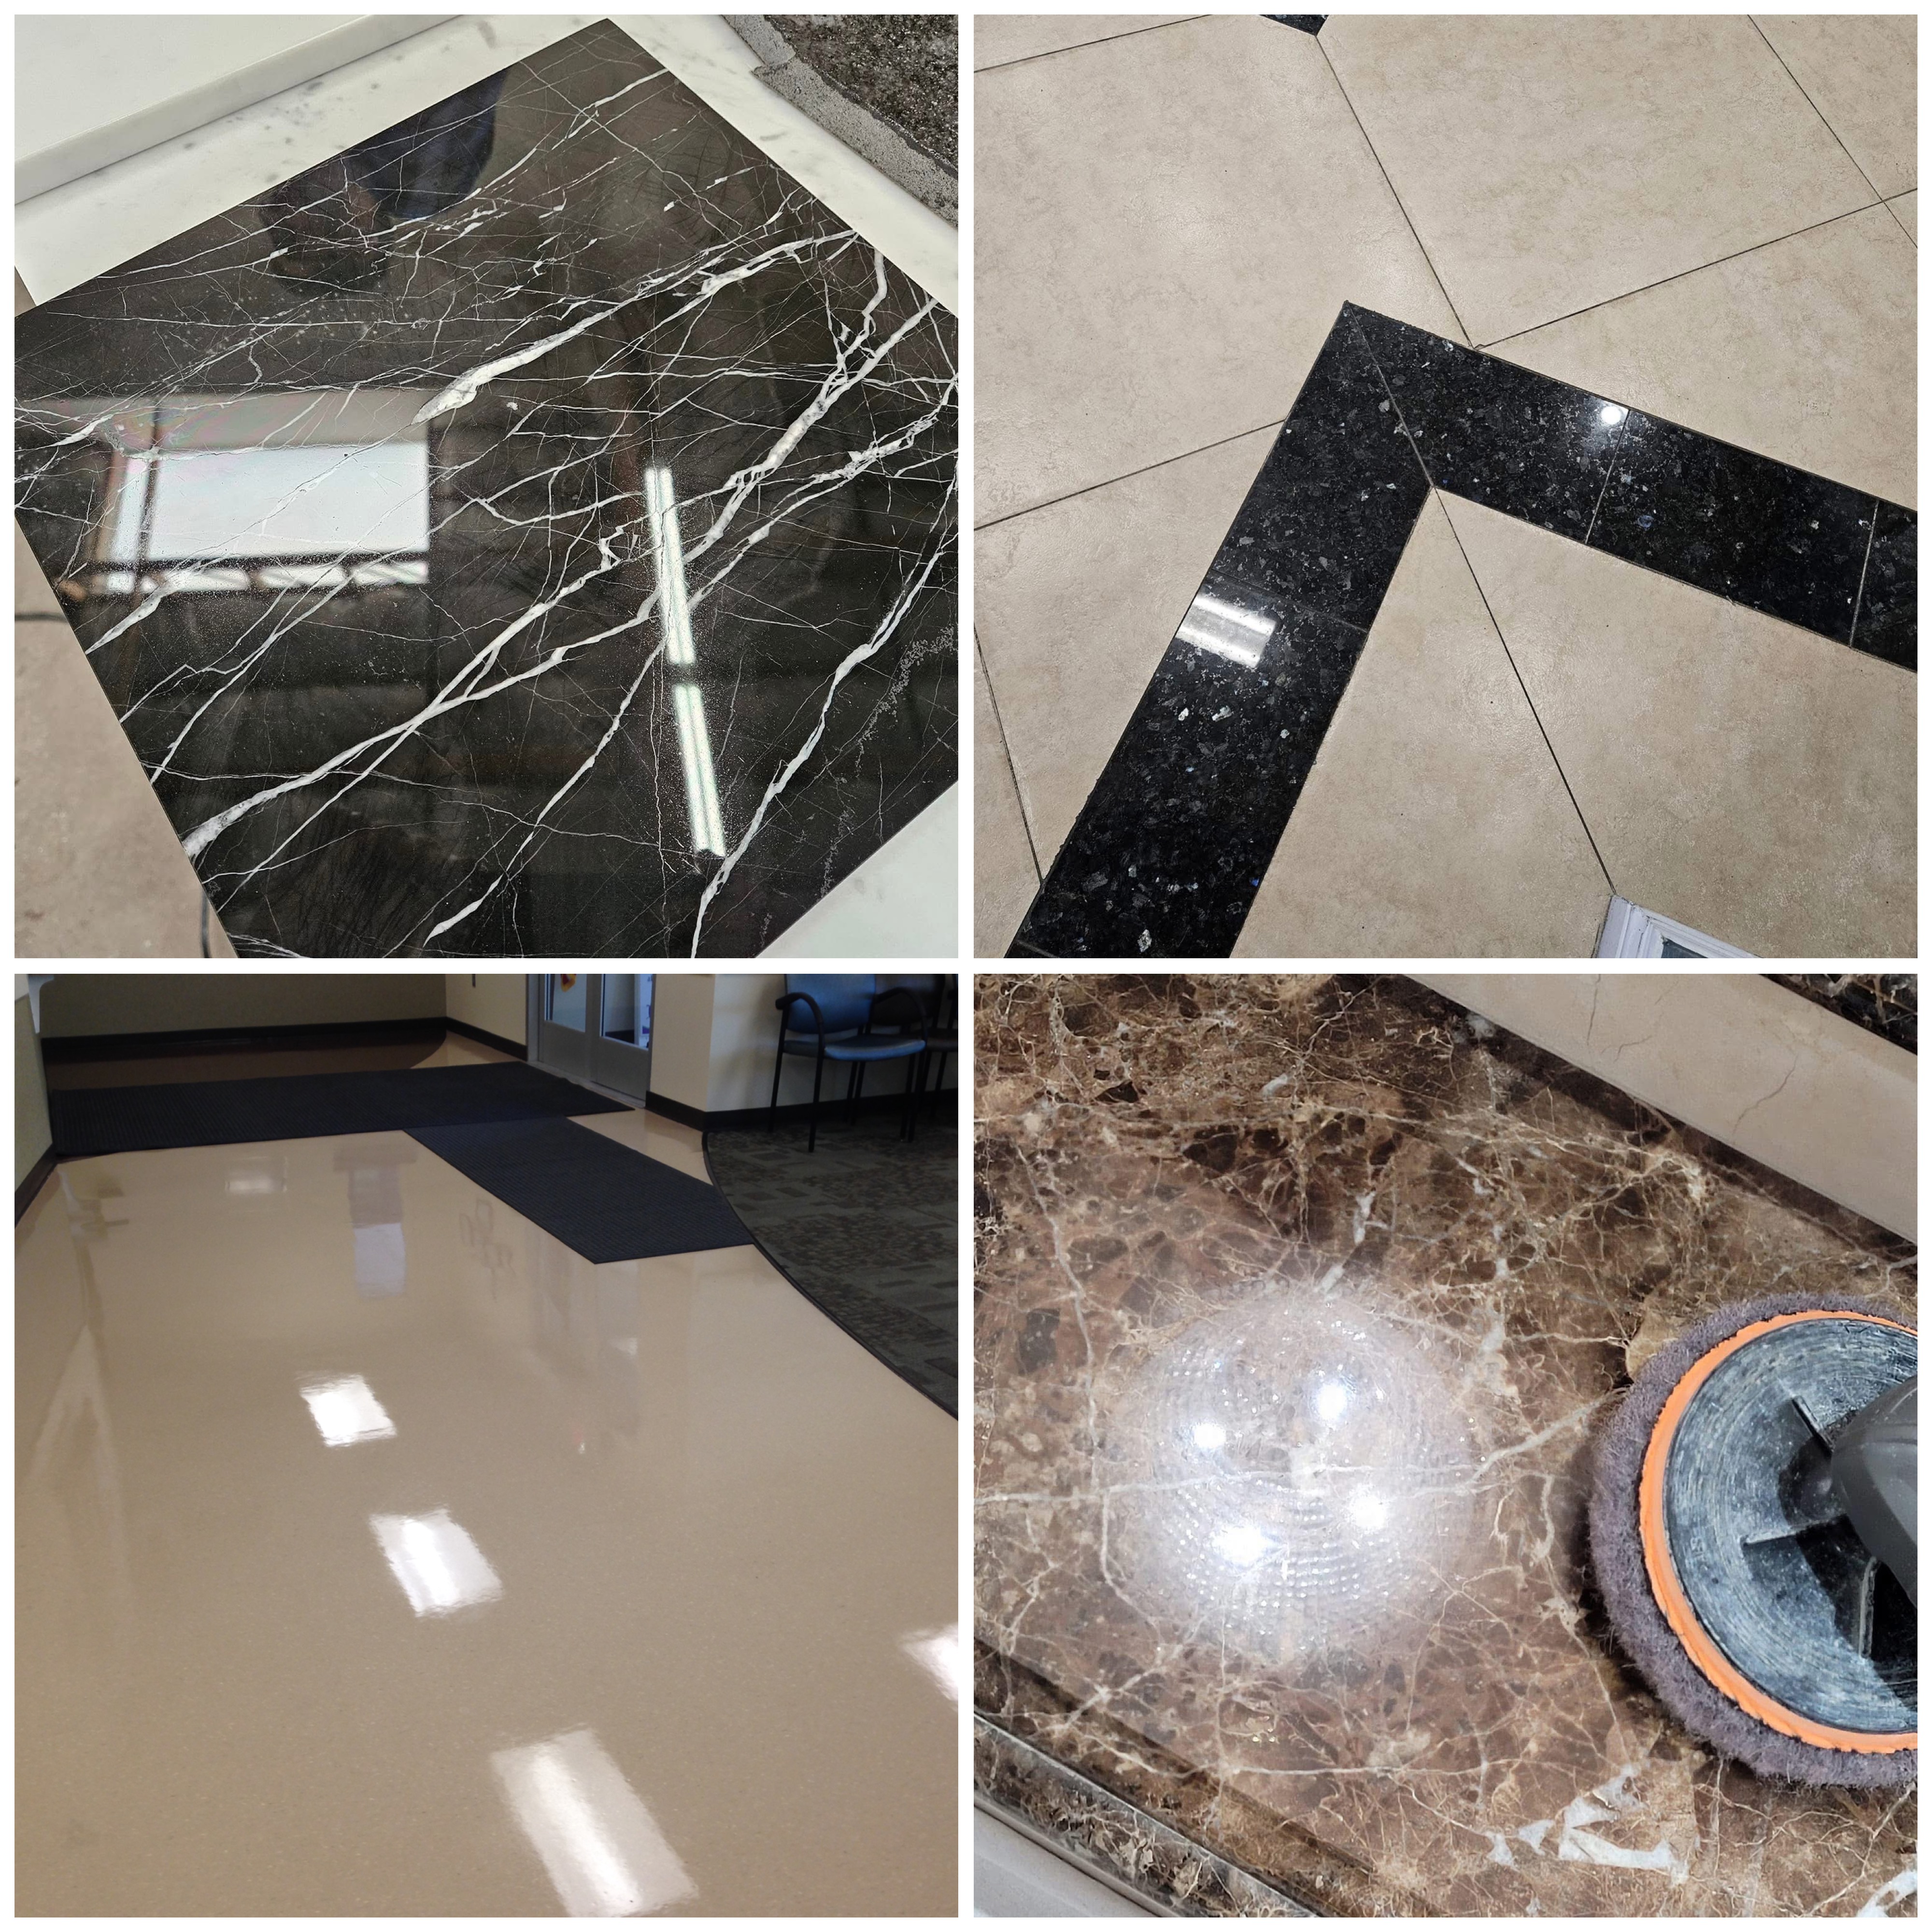
Is there a shiny top-coat guard on this polished concrete floor, or is this a natural concrete shine with no guard on top? The answer to the question may surprise you.


On the face of it, there are different concrete finishes for different purposes, so knowing your finish and your purpose is imperative for having a successful project. Also you need to take into consideration is that in many instances there is usually an architectural specification for larger projects and you may not be able to choose your methodology, so knowing both the traditional ‘no guard’ process and ‘concrete with guard’ process will be useful so you don’t miss any opportunities that come your way.

Polished concrete is growing in demand as both home builders and commercial engineers & designers are responding to the public’s desire for something architecturally beautiful, yet resilient and wear-resistant. There really isn’t anything else quite like polished concrete to fit that bill.

When done right, a concrete floor with guard compared to naturally shiny concrete floor can look almost identical. So, why would anyone choose one over the other? What are the features and benefits of each method? This article will attempt to shed light on this matter.

What is a concrete guard and where should it be used?

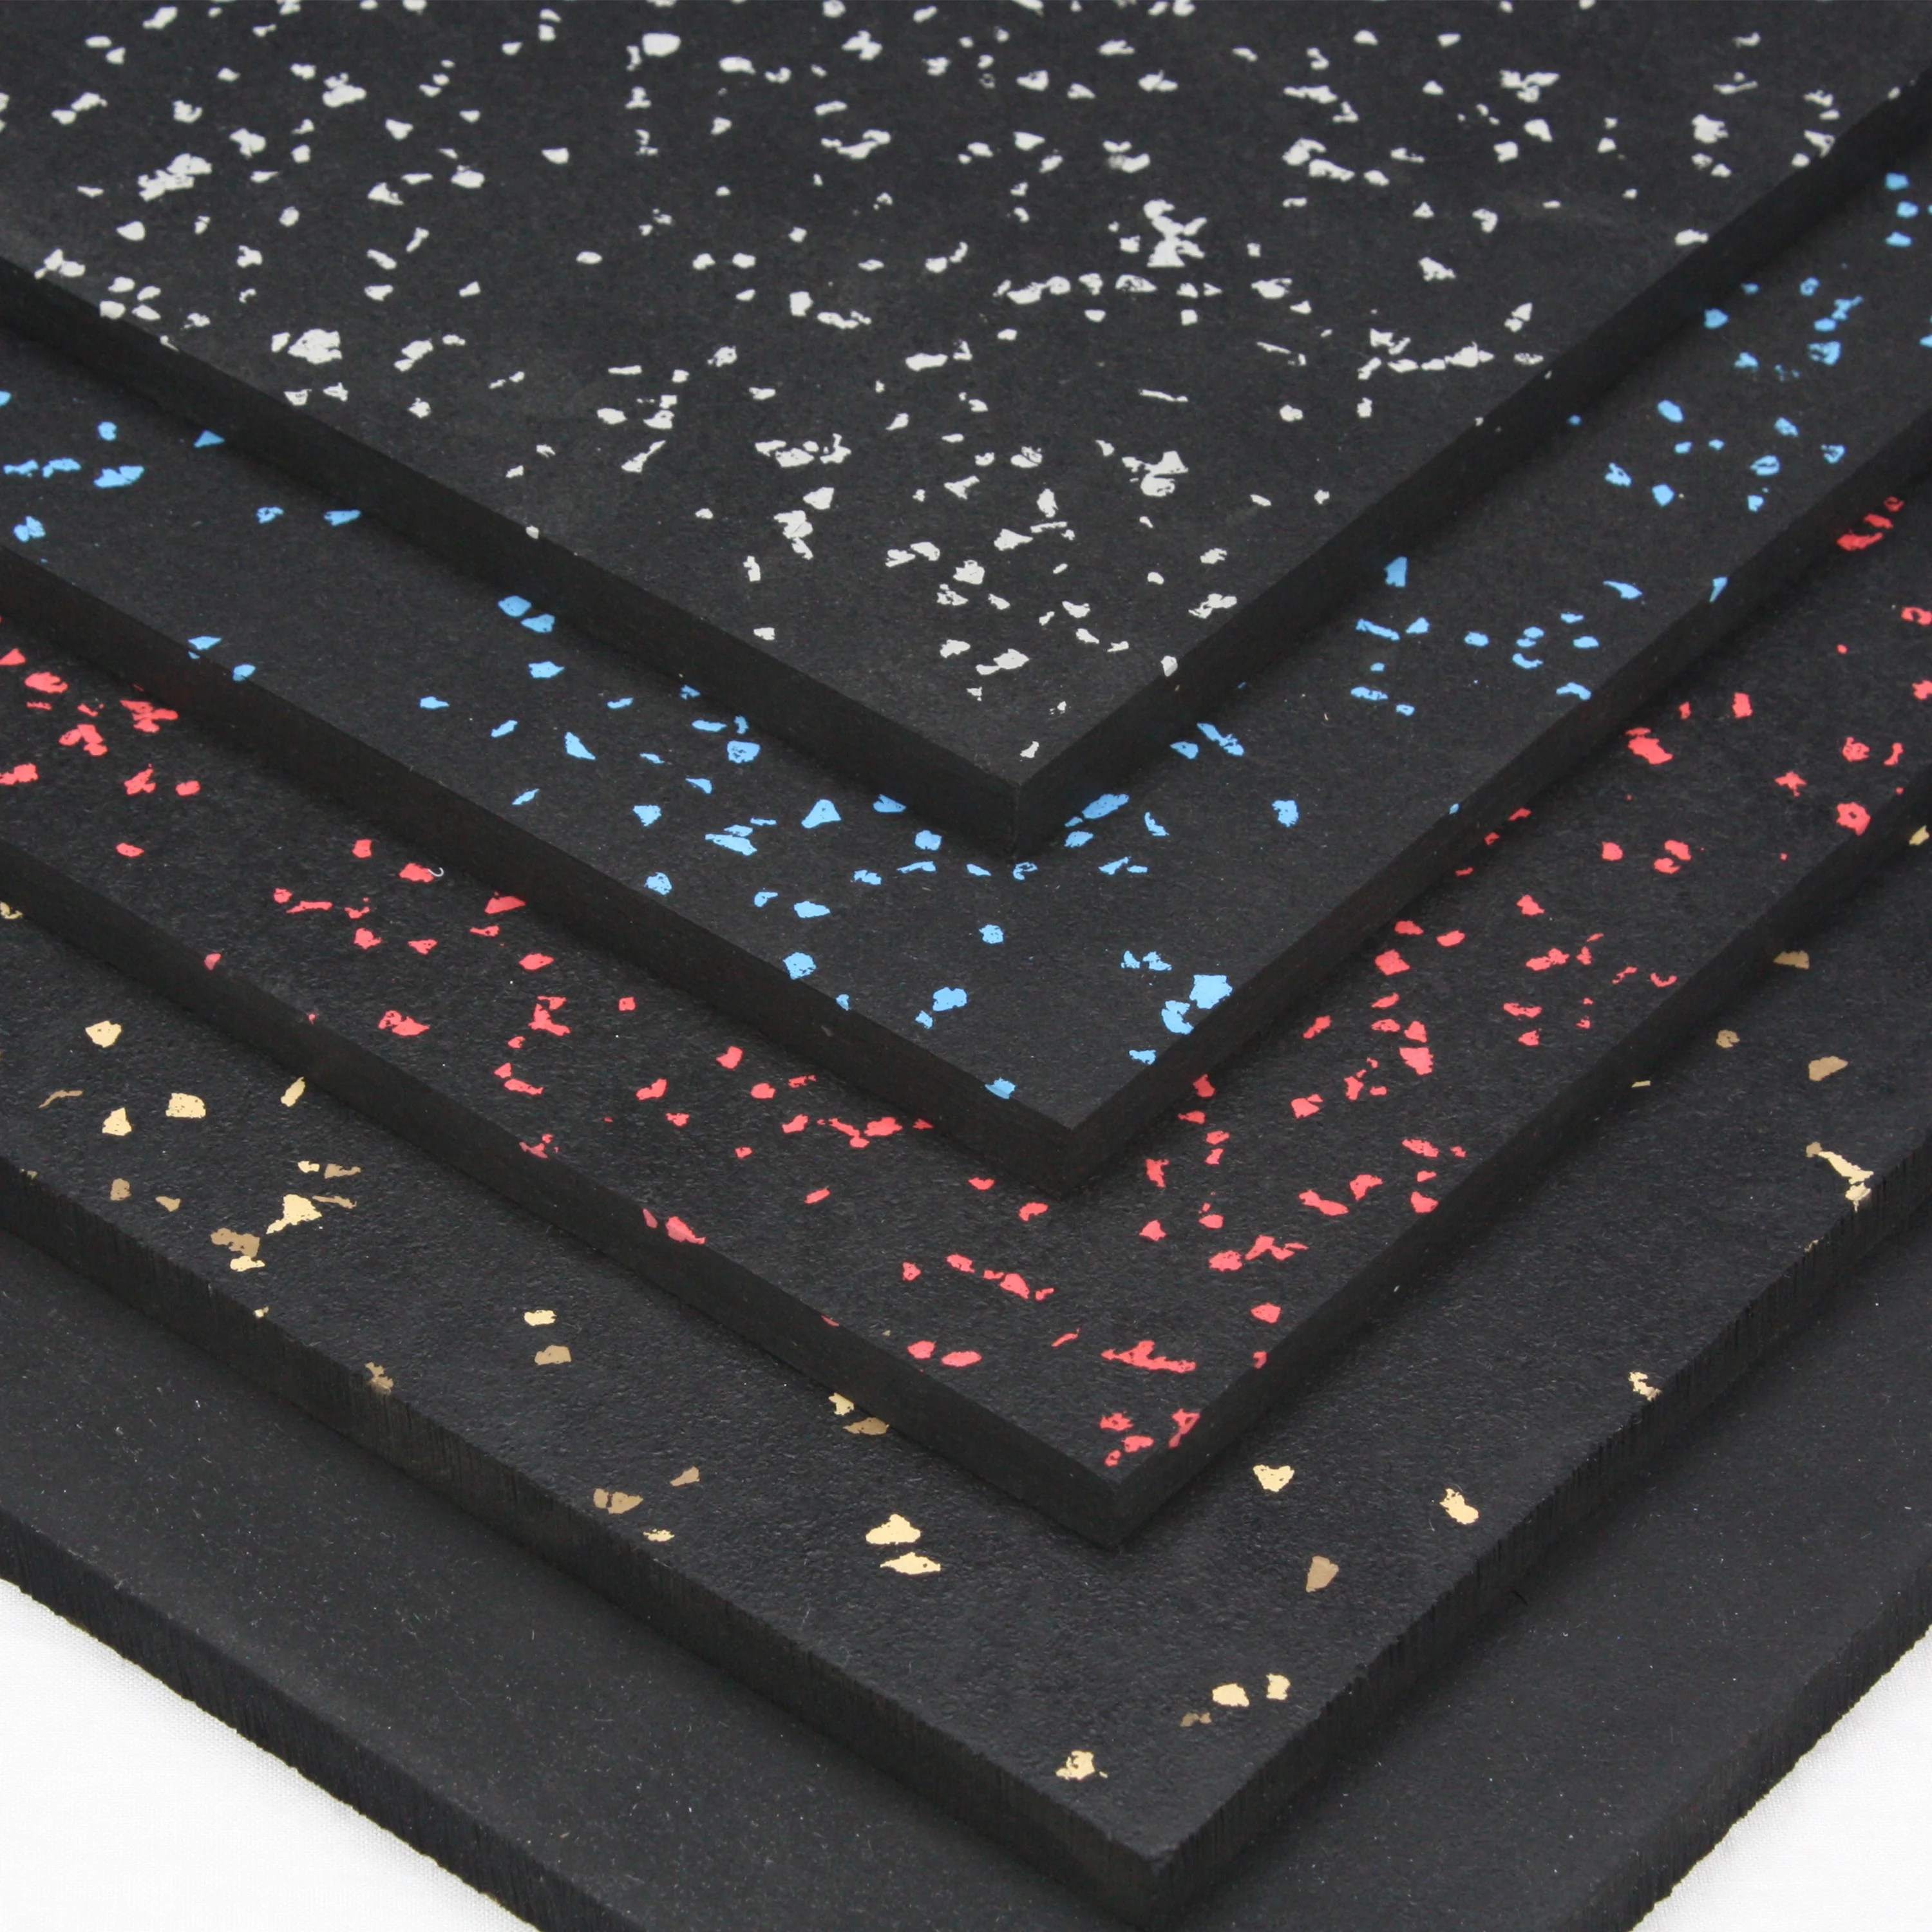
First off, a concrete guard is not a jan-san ‘wax’. It looks like a wax, it’s applied like a wax, but it is in reality a semi-topical, semi-permanent acrylic finish that usually has a chemical component in it, (such as lithium), that allows it to bond to concrete.  Guards are not thick and gooey such as a high solids jan-san wax that has 25% solids. Guards are semi-topical and are meant to soak into the concrete but leave a thin protective layer on the top.  You aren’t supposed to build up guard with multiple coats, like with a wax.

Guards need to be applied thin because concrete is very hard and almost impossible to scratch, so if you have a thick layer of guard protecting the floor the guard is going to be ‘sacrificed’.

A sacrificial coating is a coating that is meant to be put in harms way. If you drag something across a guarded floor or spill a corrosive chemical, then the guard will take the brunt of the abuse and not the concrete itself.

So, if the concrete is virtually scratch resistant, why apply a guard at all if you can make the concrete shiny and attractive without it?

Using a guard adds a measure of oil/water resistance to the concrete surface. The thin layer on top clogs the concrete pores and oil/water spills will stay on top and not soak into the concrete. This makes guarded floors very popular in supermarkets and box stores. Of course, there are impregnating concrete sealers that are not semi-topical and will repel oil and water too, but in many cases on large projects you are at the mercy of what the architect or builder specifies.

Guard also protects against acid/corrosion stains. Impregnating sealers will prevent surface intrusion of liquids, but they will not prevent a chemical process from occurring. If acid comes into contact with concrete it will eat the calcium and leave a permanent etch mark that will need to be ground out with diamond abrasives. (further in this blog we have an example of this type of etching and how we fixed it)

Also, concrete guards are also known as ‘stain guards’. Some architectural specifications call for decorative stains to be put onto the concrete. The stains sit near the surface and the guard protects the color. If something is then dragged across the floor the guard is sacrificed on behalf of the color stain. In high traffic areas the guard needs to be ground down dull with mild abrasives, then recoated and then re-burnished.

What is the argument against using guard?

It’s not the guard itself that the traditional ‘non-guard’ concrete guys rail against, it’s that some folks in the industry use guard to ‘jump up’ a shine. For instance, some may take a concrete floor that is matte finish and then apply and burnish a guard to make it look like it is polished concrete, when instead all you have is a shiny coating on top of dull/matte concrete. There is nothing wrong with doing that as long as the client knows that this is the process that is being done, but when a shiny guard on dull concrete is ‘sold’ us delivering a polished concrete floor, then you get drama…lots of drama…

Here is a case study where concrete guard is being used in an acceptable manner.

Case study: A concrete floor in a supermarket has been neglected to the point where even when clean, it looks dirty. One of my clients was called upon to provide a solution.


DSC02449.JPG

This floor has seen better days. It now always looks dirty because of ingrained soil particles embedded in the guard and the way scratches in the guarded floor reflect light to the human eye. Why did the original contractor apply a guard? Well, you can see the solid stain that is beneath the guard. Guards are meant to guard the color stain with a protective coating so if something is dragged the color isn’t compromised. If no guard was applied, then the topical stain would quickly wear into a traffic pattern  and trying to fix a wear pattern in the actual stain is not fun because usually you need to grind it all off and start all over again. if you want the stain to match.

The only way to properly deal with scratched and damaged guard like this is to scrape it down and re-apply, but be careful not to scrape far enough to compromise the color stain. (anymore than it has already been compromised…bleah) Since there is is a danger of scraping away the stain if the grinding process is too aggressive you may want to sacrifice the speed of using an aggressive grit and a dry process for the finesses of using a lighter grit and a wet process.

DSC02454.JPG

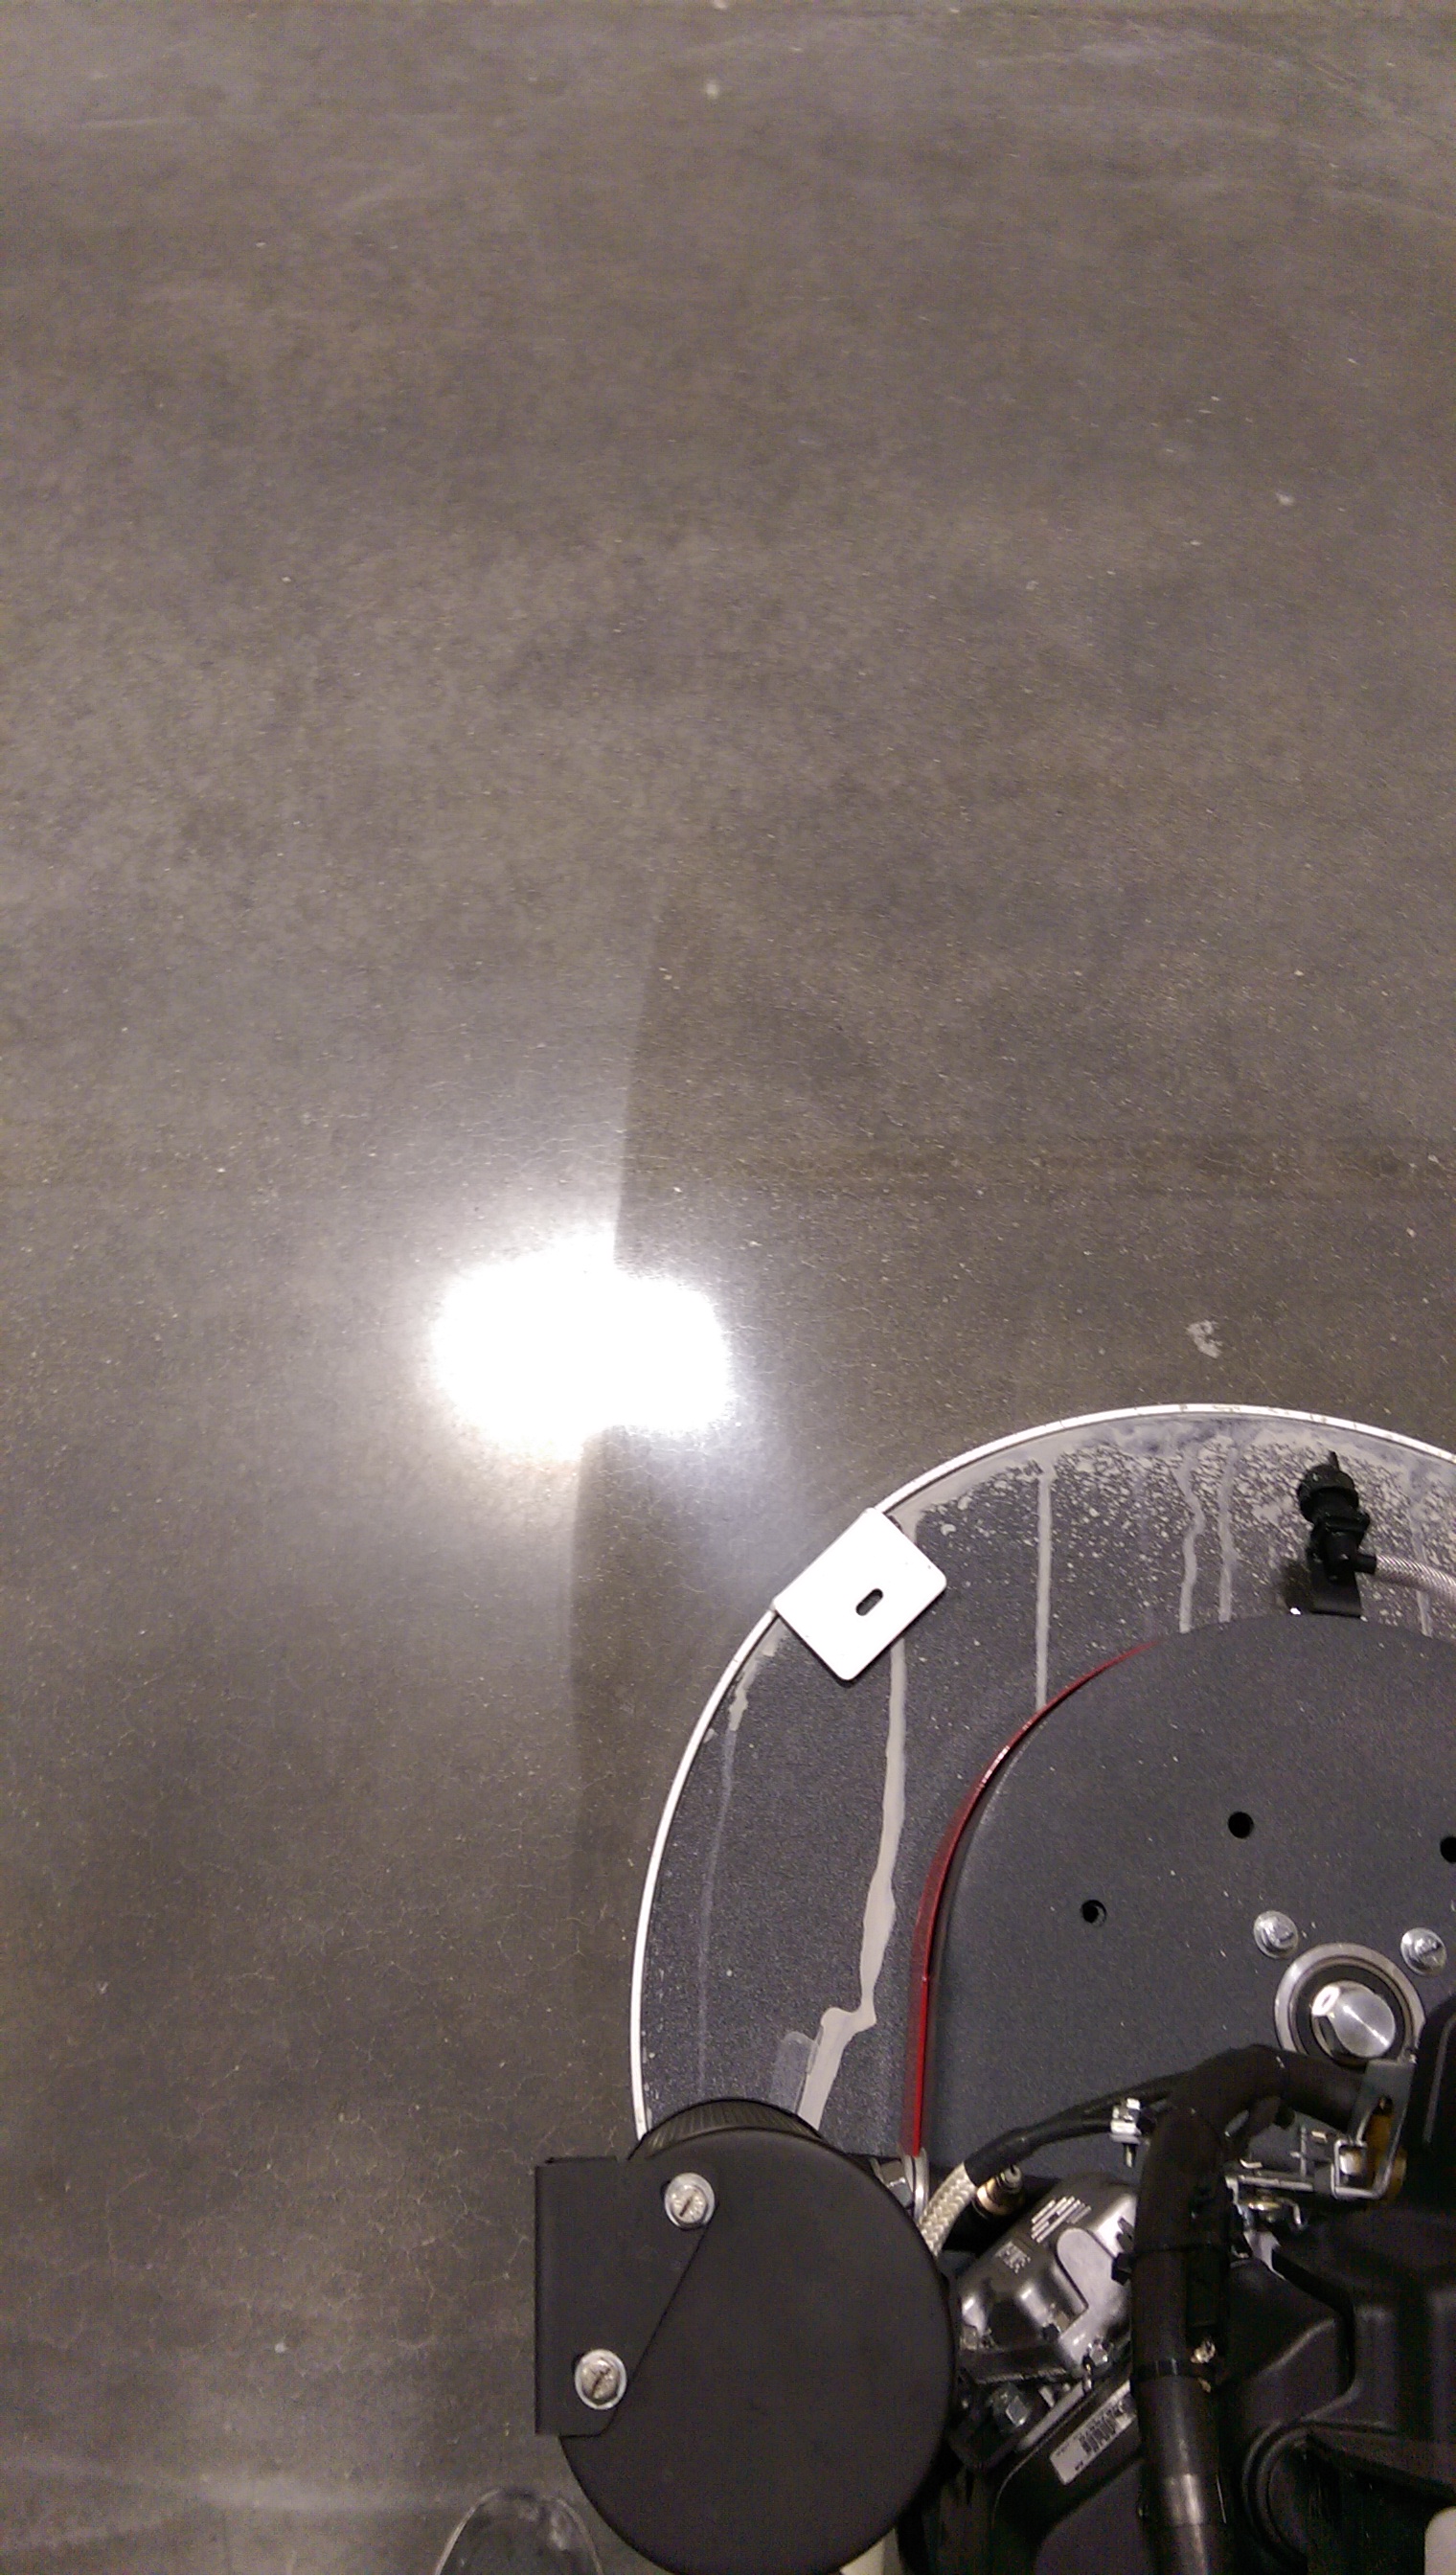
In this case study we used the STI Spin-1 Pad System, a 50lb. weighted plate and the Mytee HS 300 300 RPM single speed burnisher. For the purpose of this demo, we added some water to the floor, but not too much. This supermarket is almost always open and even when it’s closed there isn’t enough time to empty the shelves from the food products or mask everything off.  The safe course is wet and slow, and since I’m a big chicken, we took a little longer and avoided potentially contaminating several thousand dollars of cold cuts, fish and cheese products. (I’d like my salmon fillet with less concrete silica dust please…) Bleah.

Fortunately, the STI Spin-1 Pad System can be used wet or dry. These pads a natural hair and have a special diamond encrusted coating embedded on the ‘business’ side in which the diamond abrasives are held in place to be used on both guarded and unguarded concrete.

DSC02483 (2).JPG

These pads from STI are really nifty, but you need to know how to order them. They are called Spin-1 pads. I don’t know why. There is no Spin-2 pad system, Spin-3 pad system blah-blah-blah.  (you get the idea) What there is, is a  5 step system or levels of the Spin-1 pad system that are both color coded and numbered.  The Spin-1 #1 pad is the coarsest and aggressive, while the Spin-1 #5 pad is for light polishing. You can use them with a high speed burnisher up to 3000 rpm or with a weighted or non-weighted machine at lower rpms. (walk behind jan-san scrubbers too!)

There are too many variables for each floor to determine what number disk and what equipment you would need to accomplish any given task on a floor, so order all 5 so you are covered for any situation. These pads also come in a wide variety of sizes. Just remember to ask your rep for Spin-1 pads, specify the size and the grit level 1-5. Since I’m partially color blind, I won’t even go into the color code system.  Even in the picture above, the color I see is ‘bleah’.

The picture belows shows what the floor looks like after the guard is ground down and prepped for re-coating.

dsc02462

Yes, it looks ugly, but we aren’t done yet. The Spin-1 pad #3 did it’s work and scrapped the floor smooth. Even though the light reflects ugly, if you run your hand over the floor you’ll find it smooth to the touch because the blemish marks are not surface residue from the previous guard on top of the floor, but empty voids in the concrete from years of wear exposed by removing the guard. From this point, the only way to get the floor shiny again naturally, without using a guard, would be to keep grinding the concrete down to make the floor smooth and the voids disappear. That is not on the menu tonight. because the client does not want to re-stain the floor. Thus are using a guard to make the floor shiny again.

DSC02469.JPG

We applied Sentinel All Surface Floor Guard to this abused concrete floor. This is a great all purpose guard from our friends at Sentinel products.

DSC02471.JPG

Once the guard is down and it looks even, let it dry to the touch and then sit for a bit, especially if you did wet grinding and there is some moisture still potentially evaporating from the floor. In a large job site production situation you probably won’t get backed up and have to stop and wait for the floor to dry after wet grinding because you’ll have industrial fans going and a large, industrial surface area etc, but when doing a small demo spot you never want to rush it and risk fogging the guard through water evaporation through the forming acrylic membrane.

DSC02496.JPG

We burnished the Sentinel 404 guard with the 300 rpm Mytee HS 300 and a Spin-1 #4 pad dry. (for such a small spot, we didn’t worry about airborne contamination) For a larger scale area, using a 3000 rpm propane burnisher will be more efficient, but be sure to use a vacuum attachment on your polishing machine to ensure that you do not contaminate the atmosphere, especially if you are in an area where you could harm people or contaminate food. Most high speed burnishers have a portal to place a hose attached to a vacuum.

DSC02498 (2)_LI.jpg

This case study was a success. We achieved all our goals.  We were able to scrape away the scratches of the old guard without harming or fading the stain underneath. We did not needlessly contaminate the atmosphere with dust and junk by doing a dry grind. We applied new guard to the floor and burnished it, making it hard and shiny, which gave us an attractive, slip resistant surface that would repel oil stains and prevent bacteria and germs from penetrating into the pores of the concrete and forming colonies of ‘smelly bleah’ that could lead to indoor air pollution from the off-gassing of the bacteria. Finally, we were able to get this process accomplished within a reasonable budget.

Case study: A busy multi-million dollar resort has an unsealed, dingy looking sidewalk in the front that is stained from years of drink spills, gum being mashed into the concrete pores and foot traffic from incoming parking lot foot traffic tracking asphalt oils onto the concrete contributing to the overall ‘bleah’.

While consulting on this job, I suggested doing a good, smooth scrape on the surface of the sidewalk and then coat it with just enough guard to glaze the sidewalk, but not make it too shiny. This plan worked out because they wanted to color sections of the sidewalk with a dark stain, similar to what show in the previous case history in the supermarket.

002

This sidewalk had a lot of ‘bleah’ going for it. We were going to fix that…

001

This job required a measure of discretion. We wouldn’t be able to pull up with a large propane powered unit or even a large 220v grinding unit because of the noise a gas powered generator would make.  Additionally, with larger, faster moving equipment there is too much  drama in dealing with the close proximity of resort clientele, some of who would be entering and exiting the facility in various states of inebriation. The facility didn’t want us building large wooden barriers to cordon off the work area, they wanted us working behind easy to move stanchions and lots and lots of yellow ‘danger’ tape. (which everyone knows is not drunk proof…)

Here we used a heavy floor machine from Hawk. It’s heavy, sturdy, easy to use and operates on 110v electric. The abrasives we used are STI MG2 System (again with the numbers) #3 diamond abrasive disk followed by the STI MG2 #4 abrasive disk. The #3 disk is like the equivalent of a 200 grit diamond grit. We wanted to take a layer off without penetrating the cream layer too deep and exposing the aggregate.

008

We did wet…again. Even though dust wasn’t an issue outside, the noise was, so we made a little slurry and pushed it aside and then used a slurry vac intermittently to remove the material.

003

This sidewalk hasn’t been this clean in years. Bleah. This is after 2 steps. #3 and #4 MG2 STI abrasives and a good cleaning.

004

We put the topical stain on an area of the sidewalk first…

005

We then added two coats of Sentinel 404 to both areas, but we weren’t done yet.

006

We used the Mytee 300 RPM HS 300 to do a light burnish without a weighted plate. We wanted to harden the area and buff out any imperfections from mopping down the guard on a sidewalk in the sun. ( Note: I would not have recommended doing this demo in direct sunlight because of potential issues with both the dye and the guard, but the hotel requested it during the day. We did warn them that there we potential cosmetic imperfections by doing this in direct sunlight and they said they were ok with that.)

007

Ok, now it’s done. The hotel asked when they could walk on it. We told them it was ready for the public to do their worst…(and believe me, they did…)

The facility was impressed that we used equipment that could plug into their 110v external electric outlets, we did not make a lot of noise, no one complained about smells or chemicals.  We hit a home run and my client got the job.

NOW WE START TALKING ABOUT NATURAL SHINE CONCRETE WITH NO GUARD…(thank you for your patience…)

Ok, we’ve seen to case studies where using guard was practical, what about the benefits of going ‘au’naturale

Guard applied to concrete is ‘semi-topical’ which means that there is a coating on top. This coating is not impervious, it will wear and it can scratch. Naturally polished and densified concrete that does not have that layer of guard on it will not scratch like a guarded floor, (if at all)  That being said, there are many guards on the market, and many techniques for using it, but if someone says that they have a guard that performs like naturally polished concrete then they are probably overselling their product.

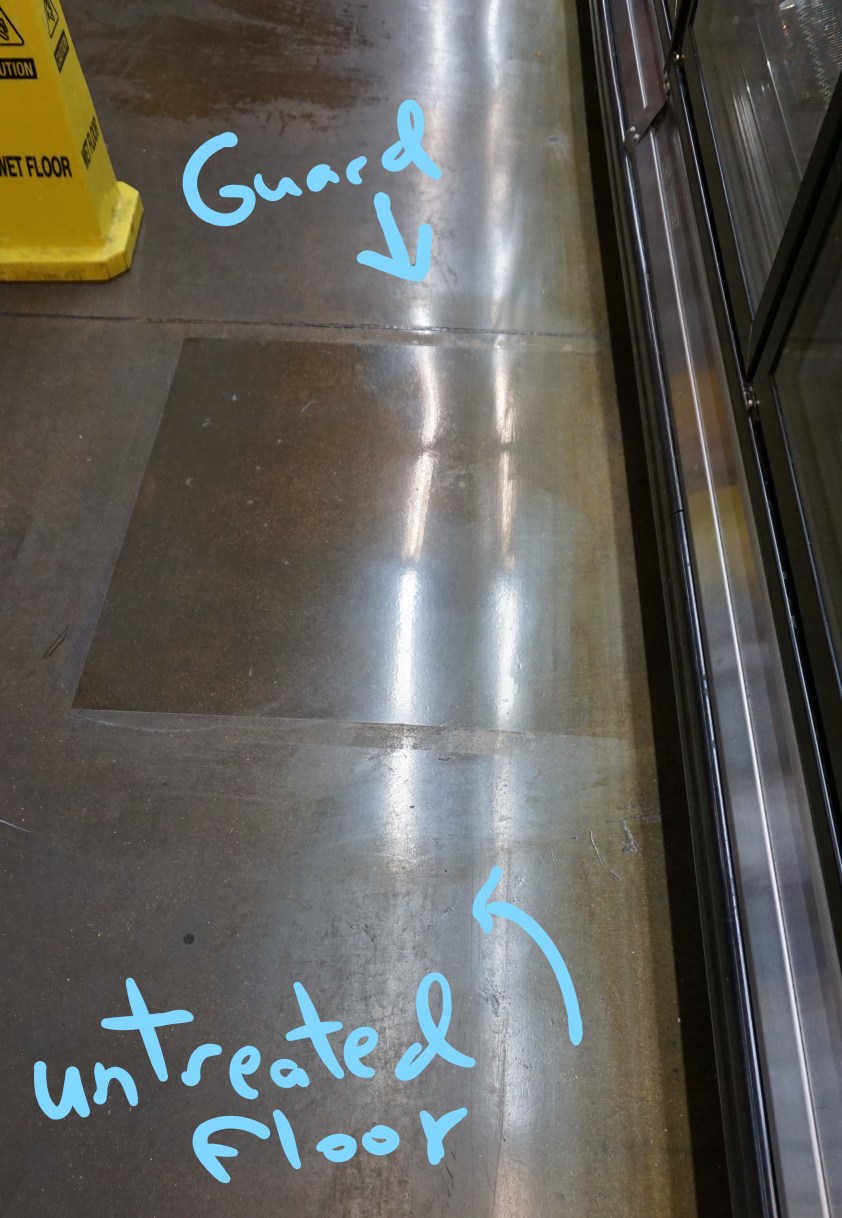
This sample area was polished shiny the ‘natural way’ and then a section was guarded, so we have guard on top of shiny concrete. 

img_7431_li

After burnishing the guard and letting it cure I then unscientifically dragged something heavy across it and vola! Had we not put the guard on the surface, we would not have a scratch.

20161014_134024_li-2

The area where the concrete was shiny and there was no guard was unaffected by the heavy equipment being dragged across it. If you look closely, from this distance you can see the scratch in the guarded area. (it doesn’t look like such a big deal from when you aren’t right on top of it…) Repeatedly dragging equipment across the bare shiny concrete will eventually wear it down, but not as quickly or badly as the shiny guarded floor.

Does this mean that guarded concrete surfaces are inferior? Nope. just different. If I took an acid based diet Coke and spilled it across both areas I’d have a nasty, permanent etch mark/stain on  the unguarded, natural portion while I could let the Coke sit on the guarded area for a few days without too much drama. The acid in soft drinks will eat the calcium in concrete but will not eat the acrylic of the guard.

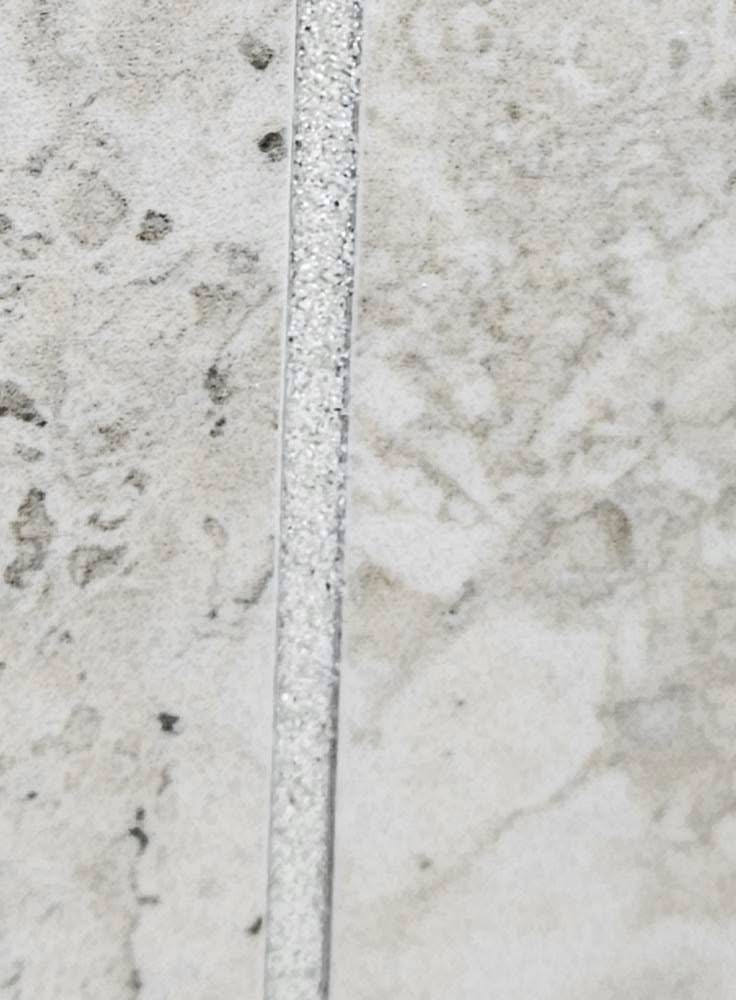
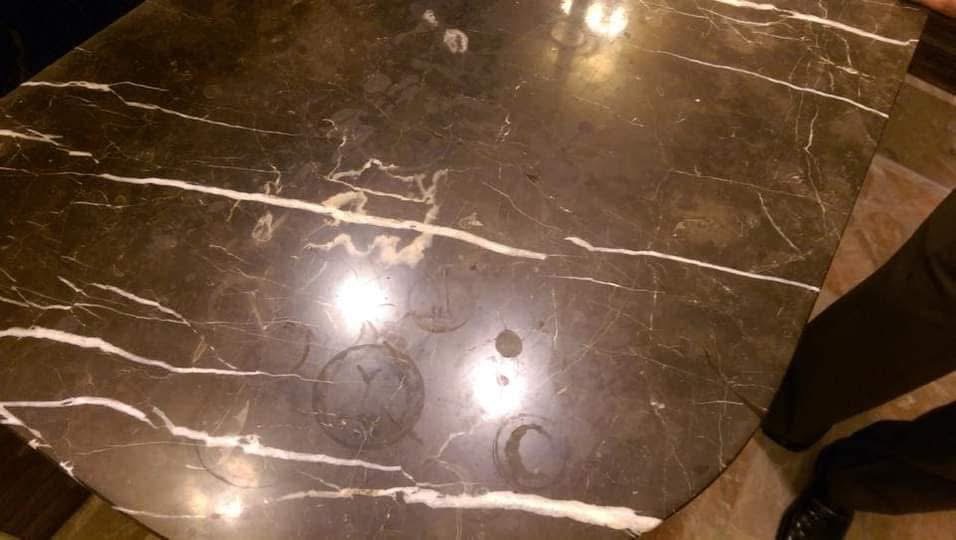
Here is an example of an unguarded concrete floor with acid etch stains.

20160721_162149

This garage floor was stained, but not guarded. Stain by itself will not seal a floor, and eventually whatever acid drama was happening in this garage, (this is Las Vegas and I have a strict ‘don’t ask, don’t tell’ policy…) came into contact with the calcium in the concrete and we had a big fat mess.

20160721_162154

Yeah, that’s ugly…or really beautiful if you are into abstract art.


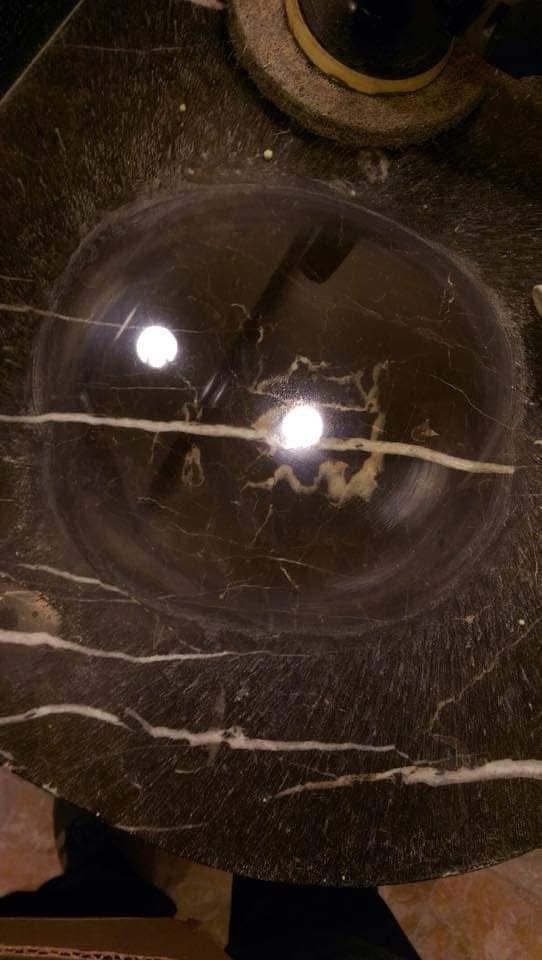
These acid stain are no problem if you know how to fix them…

In this case, cost was a factor, so I consulted with my client and suggested that we do on step of diamond grinding to get rid of the acid stains, then guard the floor, then burnish the guard.

20160721_164031

Normally you want to put guard on top of shiny concrete, but since this was not the Taj Mahal my client was able to please the property manager and score a nice job repairing acid stained garage floors.

20160721_164035.jpg

You can still see the scratch marks from the diamond abrasives, but the property owner was ok with that. They wanted to pay for as few steps as possible. If they really wanted to save money they should have sealed/guarded it properly the first time.

So where is it practical to prep concrete floors cosmetically without using guard?  

Glad you asked…

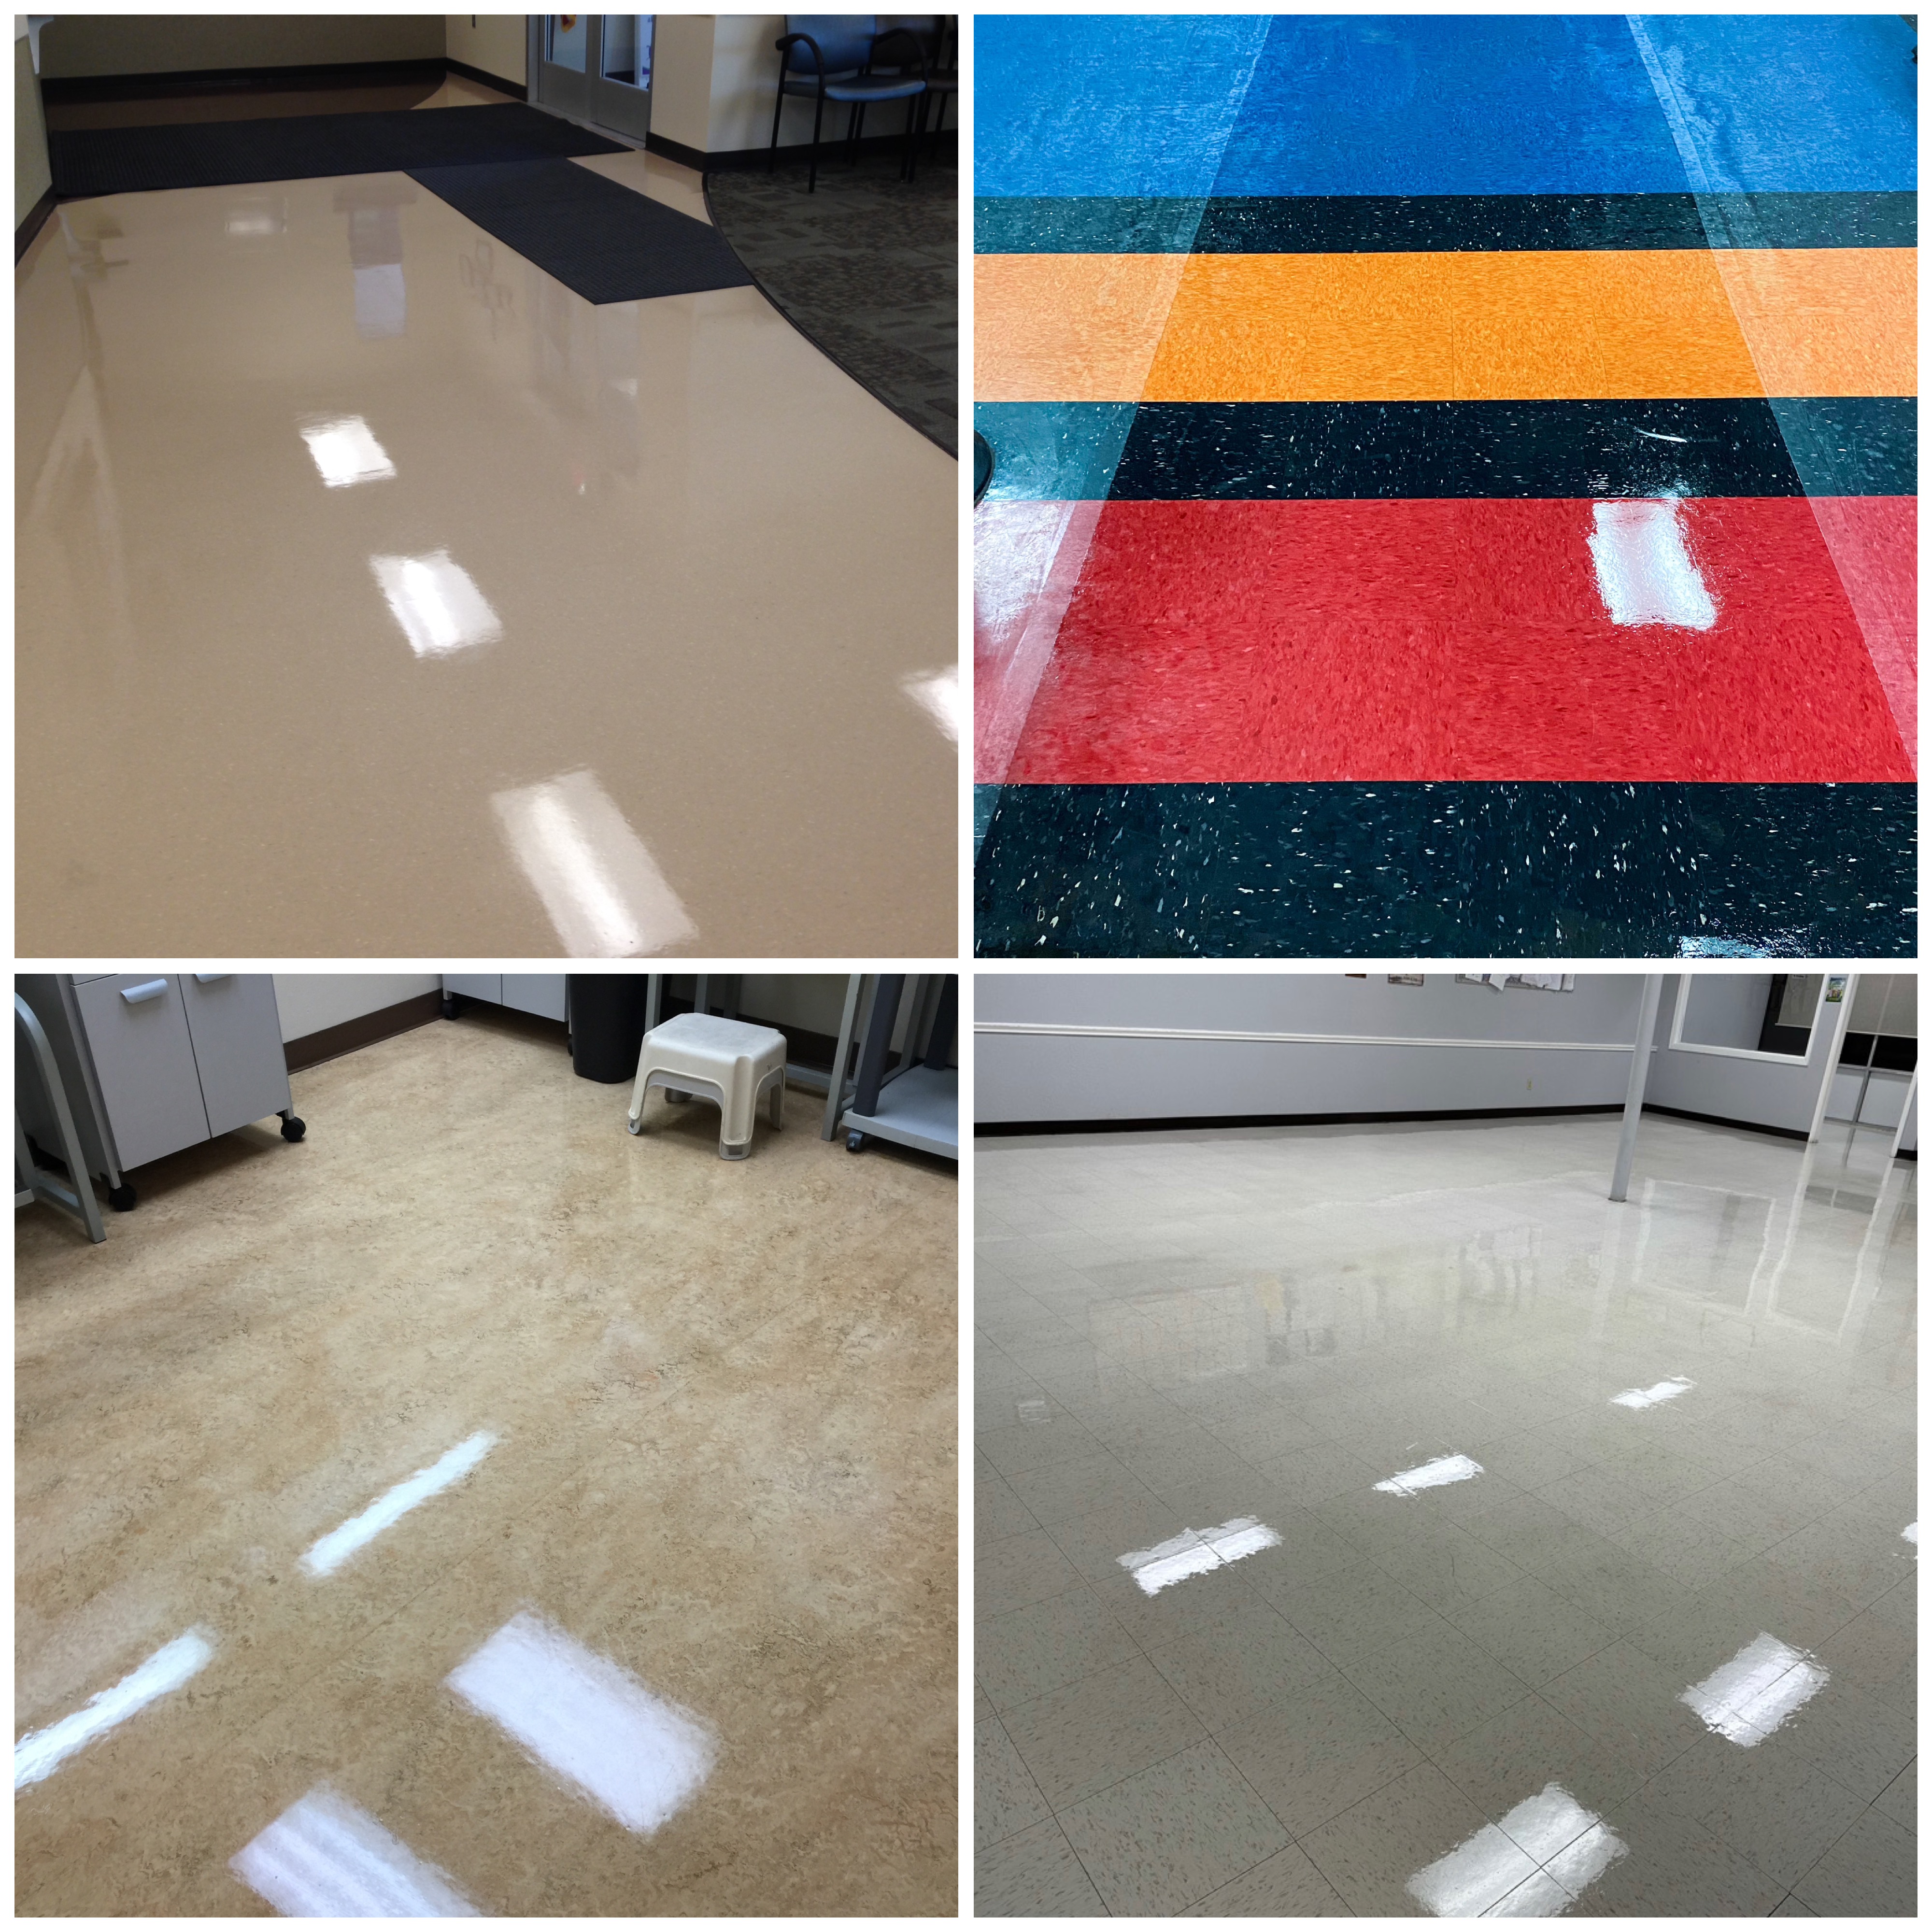
Large, industrial surfaces…

picture6

Ugly, old epoxy…bleah…

picture7

Polished to a natural sheen, not too slippery-shiny, but very easy to maintain. Sweep it, mop it, forget about it. (photos courtesy Kevin Hawthorne)

picture12

I don’t know what the end use is for this floor. A museum maybe? But this environment is the perfect place to put down an invisible, impregnating sealer and avoid scratches that will interfere with the artistic reflection of light. (photo courtesy Kevin Hawthorne)

Is it possible to misuse guard in an industrial situation?

Yes.

20160723_084809

Here is a big time fail for a large, industrial surface. This stadium facility was finished with an architectural epoxy terrazzo floor. Epoxy terrazzo is synthetic, thus there is no calcium carbonate and it will not etch. Also, because of it’s synthetic nature, epoxy terrazzo is naturally slip resistant no matter how shiny. Think of it as real hard plastic. Can it stain? Sure there are micro pores that need to be cleaned out if the contractor didn’t seal the air pockets during the installation process using an STI groutpan, but the plastic itself will not stain. Sooooooooo…why did they guard it?

I’m just there to fix the floor, not pass judgement. (I’m not a judgey guy…)All I know is that because the contractor finished with a guard, they made a footprint and scratch nightmare that gave the maintenance crew fits.  Can you imagine being the cleaning manager in charge of removed scruffs and scratches from several thousand square feet of bleah on a nightly basis??? Can you imagine what the building management was thinking after being sold on a low maintenance, scruff resistant  epoxy resin terrazzo floor and instead getting a high maintenance scruff attracting guarded floor? Bleah.

20160723_090244

I was called upon to consult on this job. I said we need to grind off the guard and start shining the floor up from scratch. The facility owners didn’t like that assessment, but the truth is the truth.

20160723_094942

This job took 8 steps. We had to grind through the ooey-gooey-sticky guard to get down to dull, bare, epoxy terrazzo and then work back up to a bright shine. The STI Mg2 pad system is 8 steps and we had to use every one of them to fix this floor.

20160723_101554

The result was a slip resistant, scruff resistant, scratch free shine. Sure, after a big concert there are plenty of scruff marks, but those marks are from shoe material leaving matter behind on the floor, not damage to the surface. When the maintenance crew uses plain water, a red pad and a standard jan-san walk behind they get back to the epoxy terazoshine instead of having to do multiple steps of polishing to grind the damage out of the guard. There is going to be periodic maintenance on the floor due to all the traffic, but only using the higher grits of the MG2 pad system, not the lower ones.

Can badly scratched guard be repaired?

Yes. The standard way to polish guard is to use a diamond encrusted pad with a high speed burnisher. That’s POLISH, not scratch removal. Sometimes the guard damage is beyond what a diamond encrusted pad can do because of deeply embedded damage.

Here we have a guarded floor in a test area in our warehouse. It started off nice and shiny, but after some months the shine wore away and scratches appeared. We used the Durashine System and the OnFloor Durashine machine to fix it. The nifty unit is 110v and perfect for those hotel or casino lobbies that need to be shined up, but you can’t bring in your propane or 220v monster grinder.  It’s 110v whisper quiet and every concrete maintenance polishing company should have one in their arsenal. You can use hard Durashine diamond abrasive pads 50 grit to 3000 or diamond encrusted pads like the STI Spin-1 pad system.

20161104_162839.jpg

20161104_150354

What make the 110v electric Durashine System by Onfloor unique is that it will let you use hard diamond abrasive goods in lieu of the diamond encrusted natural hair pads so you can more aggressively polish both guarded and natural shine floors. Pictured here are the Durashine high speed diamond pads.

20161104_170301.jpg

While you can put a shine back onto damaged guard, be prepared to put down another coat if there are any areas where the guard has worn all the way thru to the bare concrete.

Residential jobs

Architectural shiny residential floors do not necessarily need to be guarded. An impregnator will sit below the surface and thus the floor sans guard will not scratch from pet toenails, moving furniture, skateboards ect.

This floor is an example of a floor covering rip out and instead of replace the floor covering the existing concrete underneath was polished.

beforeshiny

This floor was also dyed in the process of polishing. Another blog will discuss the art of dyeing concrete floors.

aftershiny_li

Even the dog was impressed, (and I heard this dog was very picky). Not using a guard made sense here because doggie toenails will eventually put scratches into a topical guard. After applying the impregnating sealer, the floor will need to be cleaned and resealed on a periodic basis based upon how much abuse the floor takes.


Polished concrete in homes is very artsy and progressive…

Yep. Now that the concrete is polished you can put down an exotic rug down, maybe even change the rugs out for different seasons. There is a lot of seasonal interior design work you can do with a nice concrete floor and a rotating set of fine carpets. Notice how the cracks and areas where the aggregate is closer to the top add to the personality of the floor and are not treated as undesirable imperfections. No two concrete floors are alike. You can also see a faint outline where the tiles were previously on the floor before they were demolished. It’s like art. No guard, no scratches, no problem. (photos courtesy Ken Fellows)


Are there any circumstances in which it may be appropriate or advantageous to guard a concrete floor in a residential setting?

Sure. Here is a floor where the owner wanted a topical stain and a sacrificial coating of guard would be needed to protect the color.

before001

The homeowner wanted more of a solid color on the floor instead of the typical translucent acetone based dyes. If you use a penetrating translucent dye then you can use impregnators, but if you put down a topical stain, then you are guarding the floor.

after001


Under some circumstances, if the floor didn’t need to be demolished and was in good enough shape, you might not even need to grind it at all, depending on the exact circumstances.

20150723_230859085_ios

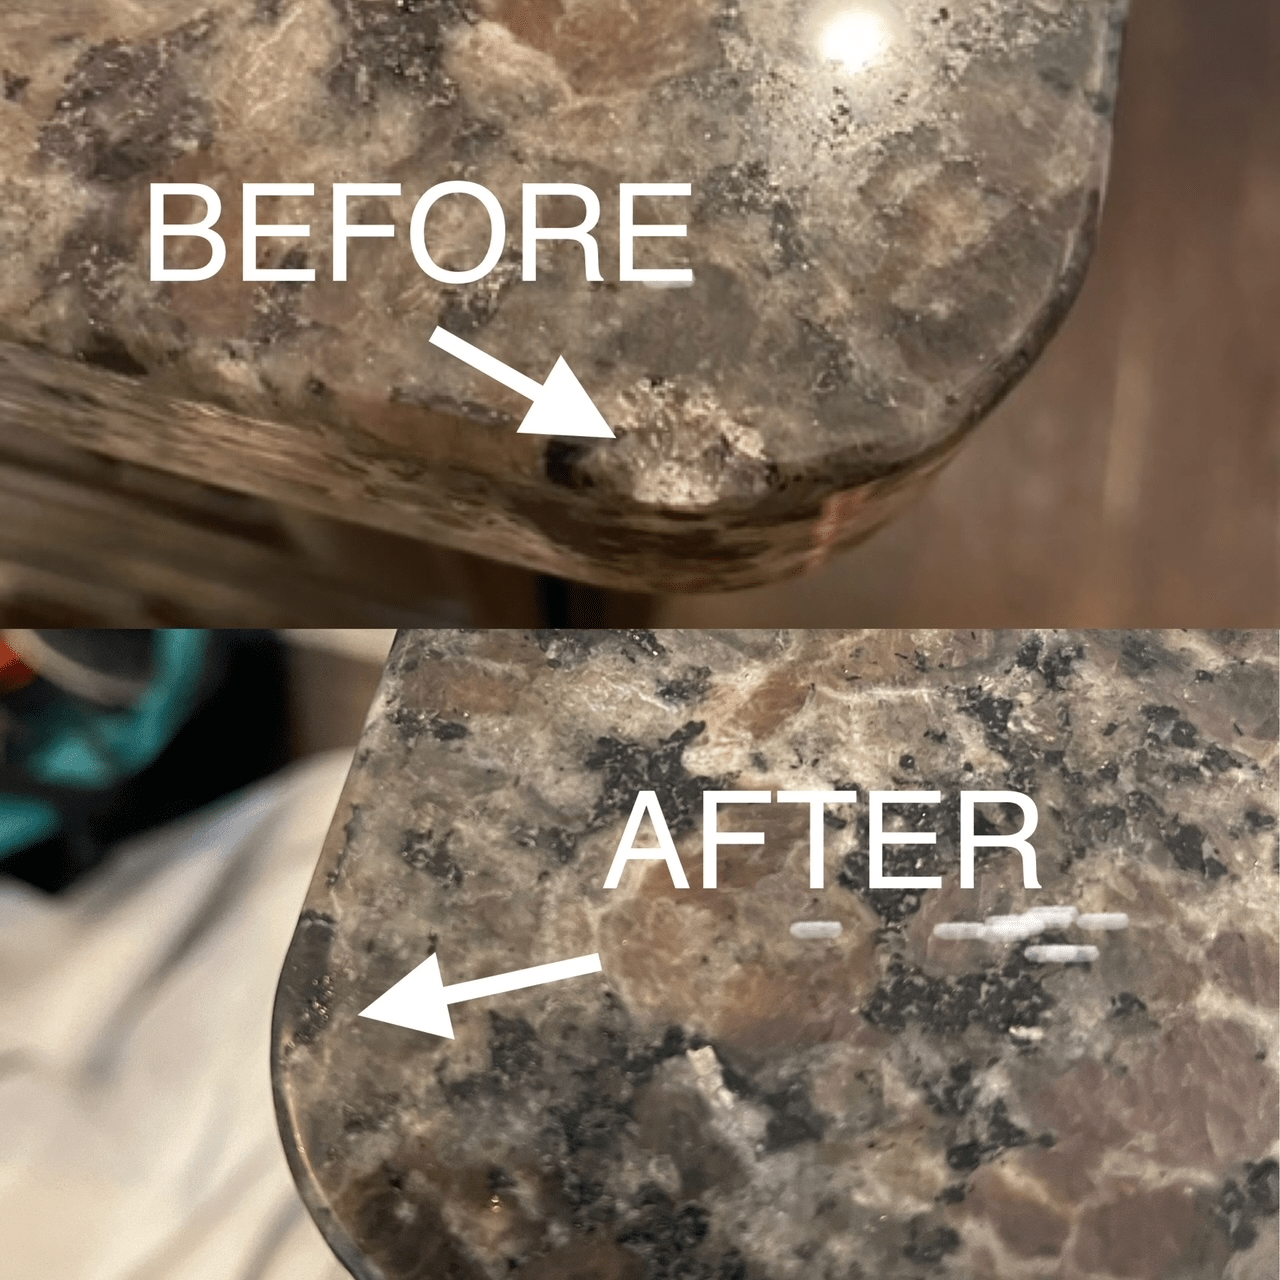
A client of mine had the ugliest garage floor in town. Bleah. He asked me for some help to get is looking spiffy again.

We cleaned it real good with an acid etching solution (to open the pores) and then put down a topical stain with an ordinary pump sprayer.

20150723_232119936_ios

After you use a pump sprayer for a job like this, you should never use it for anything else ever again. You can never really get rid of all the dye out of the sprayer after you’ve used it this way.

20150723_233415788_ios

Use a bristle broom to move the dye around a little bit and obliterate the spray patterns. The same advice goes for using a broom like this, either keep it as part of your concrete tools arsenal or throw it away. That dye gets everywhere and into everything.

20150724_003750057_ios

After the dye is dry, put down one or two layers of concrete guard to protect the dye. If you want to make it shiny, then you can burnish it, but if a semi-gloss guard finish is acceptable then you can leave it be.

20150724_004057117_ios

20150724_003915834_iOS.jpg

What made this a ‘no grind’ situation is the surface integrity of the floor. It was already flat and mostly smooth, just really, really stained. Now it’s smooth and attractive, almost too attractive for a garage floor…

Did you learn anything?

So, are you a natural shine grinder who hates on the contractors who may do a few less mechanical steps with abrasives and then guard? Are you a blow and go ‘guard shiner’ who sells the job to the client as if they are going to get a natural concrete shine and then give them a cheaper guarded shine with hardly any mechanical work being done?

As this blog shows, there is more to concrete surface prep than merely making the floor shiny, we need to access the needs of the client and give them the floor that will best suit their needs. Therefore, we shouldn’t hate on an honest contractor who correctly represents himself as to the procedures he uses to accomplish the client’s desired look.

The concrete surface prep industry is very segmented. Part of the concrete industry is involved in new construction and installing new concrete floors in both commercial and residential settings. Then there are the contractors who do remodels. They are the ones who come in and remove/demo a floor covering and polish the concrete they find under what they demo, and then there are the maintenance contractors who repair the existing floor to it’s original shine, as opposed to attempting to change the overall nature of the floor.


DSC01176

The client kept asking if it was dry enough to walk on. They didn’t believe it wasn’t wet. That’s when you know you did a good job putting a shine on concrete. I can train you how to polish concrete without using guard and also the guarded concrete process. Whatever floats your boat. It’s a big world and a big industry.

Thank you for making http://www.robertfalzone.com one of the most visited and most commented on blogs in the cleaning and restoration industry. I appreciate your support. 

To contact me for questions, feel free to leave a comment or text/call me at (702) 328-8125 for a consultation. You can also ‘friend’ me on Facebook.

Mr. Verdell Barkaroni appreciates your support too…

cropped-20170618_112727


The Versatile Karcher Mirco-Scrubber. Use it for carpet or hard surface cleaning!

Anyone who knows me knows that I am hard to please.  I enjoy doing things the right way, but I also like doing tasks quickly and efficiently.  Some ‘old school’ commercial cleaners who may still think that the best approach for commercial cleaning involves bonnets, portables, fans and walk-behind shampoo machines need to open up their minds to new possibilites and new technologies.

I recently had the chance to use the Karcher Micro-Scrubber system in a variety of situations in conjuntion with our ‘world famous’ Bridgepoint chemistry.  Some situations were ‘real life’ demonstrations in the field on real jobs and others were staged in and around our store in Las Vegas. I have come to the conclusion that when utilized in the right situation, with the correct chemistry, the Karcher Mirco-Scrubber system can have a positive impact on the field of commercial cleaning.

Karcher Micro-Scrubber by Interlink Supply! Live and in Las Vegas…baby!

The Karcher Micro-Scrubber can be used on commercial VCT, natural stone floors, ceramic tile floors, concrete, and finally, low-pile commercial carpet.  Yes, you heard me. The Karcher Micro-Scrubber, under the right circumstances, is a great choice to encapsulate carpet. It will never replace a BrushPro, but it’s two gallon fresh water tank is a great way to dispense Bridgepoint Encapuclean as you eat up miles of commercial carpet in an office building, hotel or other commercial facility.

I put together a little video to demonstrate the varieties of uses of the Karcher Micro-Scrubber.

As you saw in the video, underneath the machine are two cylindrical brushes that can be changed out rather easily. There are several different brush types and you need the correct one to get your job done right.  Karcher has a very stiff concrete brush, a mid-level brush for stone and  a very soft carpet  brush.

If you plan on using the Karcher as a dual purpose machine for both carpet AND hard surface machine, then you will need to purchase an additional brush set.

The Karcher Micro-Scrubber comes with a standard brush set, which is for hard surfaces.  In my opinion, it is worth the extra money to order the carpet brush set because even if you don’t plan on encapsulating carpet, you will eventually come across a commercial job that will have some carpet and you’ll be glad you had the brushes in your warehouse.

Like the brushes that swap out, there is a rubber squeegee set that is used with the vacuum system for hard surface cleaning can be changed out for stainless steel vacuum bars that allow the machine to be used to clean carpet. I guess the designers originally meant for the Micro-Scrubber to be used with traditional carpet chemistry because the vacuum is meant to pick up solution from the carpet.

When you are using the Karcher Micro-Scrubber for low moisture encapsulation, you will have no need for the vacuum and the purpose of the vacuum bars is only to assist in the gliding of the unit across the carpet.

Still, it’s nice to know that if you are in a commercial situation and you have a ‘bio-hazard’ with the commercial carpet, such as vomit or urine, you can use the Karcher Micro-Scrubber as a traditional carpet extractor just by turning the vacuum on. The unit will dispense carpet rinse, the brushes will agitate and the vacuum will suck it up, just like a traditional extractor. Turn the vacuum off, and you are back to encapsulation.

This is a great value because when you are doing an encapsulation job and you have an area that is hammered and needs to be extracted, you can use Bridgepoint FLEX or TRAFFIC SLAM as a pre-spray in the affected areas and then rinse with the pH 5 Encapuclean02 that is already in your tank for low-moisture encapsulation. Genius! Leave that smelly, beat up old portable in your workshop, you have a Karcher Micro-Scrubber on the job!

Underneath Karcher Micro-Scrubber

Underneath the Karcher Micro-Scrubber you see two hard surface brushes and the suction squeegees.

The inside of the Karcher waste tank holds 2 gallons. The black lid holds 2 gallons of fresh water.

That being said, not all carpets can be encapsulated efficiently with the Karcher Micro-Scrubber.  The Karcher does best with low-pile commercial carpets that do not shed, (such as carpet tiles) and that’s ok because there are miles of low-pile commercial carpet tiles out there to clean.

Karcher Micro-Scrubber Encapsulation

Karcher Micro-Scrubber Carpet Encapsulation

It’s moving so fast I had a hard time getting a clear picture. Now I know the drama that Bigfoot and UFO photographers go through to get a clear picture of their subjects.

The Karcher Micro-Scrubber will not work well with the BrushPro Dry Powder system and it will not pick up debris like the BrusPro with the renovator attachments, so if you plan on buying a Karcher Mirco-Scrubber for encapsulation only, then you should consider buying a BrushPro to go along with it as a ‘pile lifter’.  I used the Karcher on a ‘low pile’ wool carpet in a hotel and while it encapsulated just fine, there were still some ‘carpet boogers’ that won’t pick up with the vacuum and it required the use of a BrushPro with renovators to pick the boogers up efficiently.

In a hypothetical situation where a BrushPro is being used as a pile lifter alonside a Karcher Micro-Scrubber being used as an encapsulator, an employee can run ahead with a BrushPro and pile-lift the carpet, pickup loose debris and then the Karcher Micro-Scrubber can come behind with it’s 2 gallon tank and quickly encapsulate an area.

Also, while the majority of square footage on a commercial carpet job can be cleaned with liquid encapulant only,  there are still some areas, such as outside a lunch room or in the main lobby that could use the extra love that only the BrushPro Dry Powder system can offer.

Miquel teaches how to use a BrushPro with the renovator attachments as a pile-lifter

Miquel teaches how to use a BrushPro with the renovator attachments as a pile-lifter.

Now there may be some of you out there that haven’t used a BrushPro yet and you may not realize how effective the renovator attachments are for removing debris from the carpet. Here is a picture of what got pulled out of the carpet in my own home AFTER using a very expensive vacuum first. Pile-lifting the carpet in advance of encapsulation is both necessary and beneficial.

Lisa and I have 3 Persian cats and a mutt named Mr. Verdell Barkaroni.

I have 3 Persian cats and a dog. If I didn’t work for Interlink then I’d have to buy a BrushPro for myself.      What’s your excuse for not having one?

Look what a BrushPro with the renovators attached pulled out of just a few feet of commercial casino carpet. There is nothing like a BrushPro.

The main reason you want a BrushPro working alongside the Karcher Micro-Scrubber, is that after you do the carpet and put the BrushPro aside, you still have income earning opportunities with the Karcher Micro-Scrubber.

Commercial Concrete

Exterior commercial concrete is not problem for the mighty Karcher MIcro-Scrubber!

The Karcher Micro-Scrubber, when used in conjunction with the Bridgepoint Viper Concrete Cleaning System EATS UP commercial concrete.  You can do a sidewalk, a driveway, a loading dock, or any other commercial concrete application that you can think of with the same machine that can encapsulate the carpet.

Greasy concrete garage floor get's cleaned up in a jiffy!

Greasy concrete garage floor get’s cleaned up in a jiffy!

The Karcher Micro-Scrubber can also be used with the Spinergy Stone Polishing system. Whether your are in a residential mansion using the Spinergy Stone system to polish travertine or a swanky office building working hard to make their marble floors shine, the Karcher Micro-Scrubber is a GREAT tool for picking up the slurry from the Spinergy diamond encrusted polishing pads.

What a team! The Karcher Micro-Scrubber and a weighted Versa-Pro with the Spinergy system!

What a team! The Karcher Micro-Scrubber and a weighted Versa-Pro with the Spinergy system!

You may be thinking that since you already own a portable with a hard surface wand you don’t need this machine to pick up the stone slurry.  Let me tell you, the Karcher is WAY easier to setup and use than a portable for picking up stone slurry. The brush action means that you don’t need to flood the floor with water to get the encrusted slurry to move.  The two gallons of fresh rinse water in the Karcher tank will go a long way on a stone job. It’s also a lot quieter than a portable and it is easier to change out the dirty water with the ‘picnic basket’ handle design.  It also looks nice and neat, which means a LOT when you are in a fancy home with wealthy customers.

Another way to use the Karcher Micro-Scrubber is at night is to maintain VCT floors. VCT stands for vinyl composite tile.  It’s those squares that are all over at supermarkets and 7-11’s.  It’s everywhere. If you say ‘no’ to cleaning commercial  VCT then you are giving up a valuable source of income.

Use Bridgepoint Pine-Boost to clean a waxed floor before re-coating or clean a bare VCT floor in preparation of putting down wax.

Use Bridgepoint with diluted Pine-Boost to clean a sealed VCT floor before re-coating. You can also scrub a bare VCT floor with Pine-Boost in preparation of VCT before sealing.

If you are doing commercial carpet in a bank or office building, then the employee break room is probably either going to be VCT or ceramic tile. You can try to drag a mile of truckmount hose up 3 flights of stairs or wrestle with the setup of an auto-dump, auto fill high pressure portable, or you can change out the encapsulation brushes on the Karcher Micro-Scrubber for the hard surface brushes and zip out a break room and a couple of bathrooms without breaking a sweat.

The Karcher Micro-Scrubber on a commercial ceramic tile floor will save you time and money!

The Karcher Micro-Scrubber ROCKS when used alongside Bridgepoint chemistry!

Look at the clean spot I made using the Viper Concrete system at the greasy, dirty entrance of a world famous casino in Las Vegas!

If you are looking for a Karcher scrubber to use as an encapsulation machine that has more range and is battery powered, you can choose between some great walk-behinds and even a ride-on machine!

You can walk…

…or you can ride. The choice is yours!

At the end of the day, you can be sure that if you are interested in doing commercial cleaning, then your local Interlink Supply has something for you.

Remember, instead of buying equipment and then frantically trying to bid on work to match your equipment, go a look at commercial jobs you want to bid on and then find out what kind of equipment is being used there right now. Then, ask yourself is there a quicker, more efficient way of getting the job done, maybe something that you can put in your bid to give you the edge?

Is your level of education up to the task of putting competitive commercial bids together in your market? Do you need to join a program like Larry Cooper’s PCR Network?  Goto Larry’s website at www.pcrnetwork.com and maybe Larry can assist you in getting the jobs you want in the commercial field. 

The equipment is only part of the equation when working in the commercial field. Using Bridgepoint chemistry available at Interlink Supply will give you the options you need to do commercial cleaning. Whether you are using the Viper Concrete system, the Spinergy Stone system, the Encapuclean low-moisture encapsulation system, or the BrushPro Dry Powder system, you can be sure that your commercial clients are going to be impressed with the crisp cleanliness that only high quality Bridgepoint products can bring to the job.

Thank you for taking time to read this blog. Interlink Supply has the best educated and friendliest sales staff in the industry. If you have any questions about using Karcher machines along Bridgepoint chemistry, please call us and let us assist you.

If you are in the Las Vegas area, please visit us at 7001 W. Arby, Suite 130, LV,NV 89113 (702) 946-1055 or visit http://www.interlinksupply.com to find a dealer near you.

I hope you found this blog on the Karcher Micro-Scrubber system helpful. Please check back again for more interesting and entertaining articles about our adventures in cleaning the nicest dirty town in the world, Las Vegas…baby!

Robert Falzone, Interlink of Las Vegas